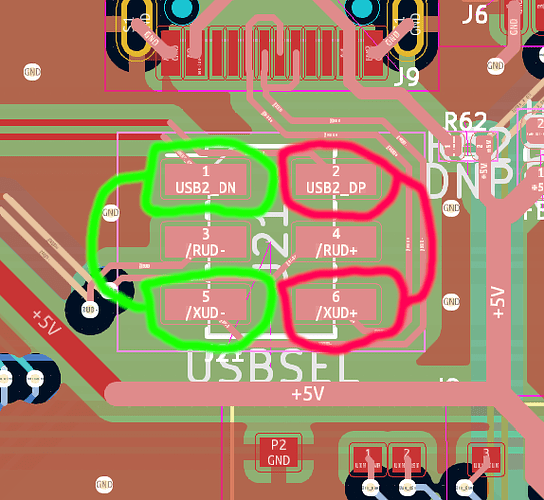
So using my bodge wires, I was able to fully recovery by Pocket Reform with IMX8MP. The steps were as follows:
NOTE: The following starts with the Pocket Reform switched off. It will need to be powered on when you are done, but for the first steps you should disconnect the charging cable, and the green and black battery cables at the bottom of the board per the maintenance advice in the manual.
- Remove jumpers from J21/USBSEL header on Pocket Reform motherboard
- Solder 1 wire between pin 1 and 5 on J21 USBSEL
- Solder 1 wire between pin 2 and 6 on J21 USBSEL
- Switch the small switch on the IMX8MP SoM labelled BOOT to the ON position. For the computers amongst us, this is not the “1” position, but the ON position, which says “NO” if you look at it the wrong way. Note this is not the BOOT1 jumper on the carrier board, but the small DIP switch with kapton tape over it on the actual SoM board. You’ll need a little screwdriver or whittled bone or something to do this.
- Connect a USB cable to the SYSUSB connector. I used a USB-C to USB-A cable, and plugged the USB-A into my desktop computers. I found that a USB 2.0 USB-C to USB-C did not work, likely because the resistors interfered with the operation of USB-OTG negotiation or something like that.
- Reconnect cables (battery & charger cables) and switch the Pocket Reform on.
- On the computer you have connected the other end of the USB cable to, you should see a USB device appear with ID
1fc9:0146 NXP Semiconductors SE Blank 865. You can check this withlsusbif you’re on Linux etc. - Download and install UUU (the IMX manufacturing tool). It is packaged for most operating systems - on NixOS I just ran
nix-shell -p uuu. It’s also packaged for Debian unstable/sid I think. - Download the latest imx8mp u-boot image from the build artefacts in the latest CI job from this MNT project. The one I used was called
imx8mp-mnt-pocket-reform-flash.bin - Run
uuu -b emmc imx8mp-mnt-pocket-reform-flash.binin the directory where you have downloaded the u-boot binary from MNT - This will upload and run u-boot from USB. You should be able to either boot an inserted SD card with the system image on it, or if you have an intact system image / install on your eMMC, you should be able to boot that too
- Once booted into either an SD image or eMMC install, you should download the u-boot binary onto the Pocket Reform itself.
- I found the
uuu -b emmccommand didn’t properly flash the u-boot binary onto the emmc for some reason, so once I was booted via UUU, I usedddto update it. First you need to enable writing to the boot part of the eMMC withecho 0 > /sys/class/block/mmcblk2boot0/force_ro. This needs to be run as the root user, so usesudo -ito get a root shell first, if you’re not logged in as root. - With the u-boot image downloaded to
imx8mp-mnt-pocket-reform-flash.bin, rundd if=imx8mp-mnt-pocket-reform-flash.bin of=/dev/mmcblk2boot0 && sync. This also needs to be run as root. - You should now be able to turn the BOOT switch on the SoM to “1” aka off, it shouldn’t be set to “ON”.
- Reboot your Pocket Reform, and you should be able to boot up as normal and boot either an SD or eMMC install.
A very skilled MS-paint level drawing of how the bodge wires should be connected:
