Any small details that might’ve stumped you on your build, or common issues that happened on your first couple of times using your MNT?
Thanks in advance!
-BuiltBest
Any small details that might’ve stumped you on your build, or common issues that happened on your first couple of times using your MNT?
Thanks in advance!
-BuiltBest
I remember two things specifically:
So it arrived. I’m curious, did you reached to Crowd Supply support for information about the delivery and was it helpful?
Follow up on the previous thread here: Crowd Supply Order Update
So the day that I posted the other thread, I got an order update stating that they cancelled the wifi card that I ordered with the kit (part was discontinued) and then the next day, my order was shipped out, so just perfect timing I guess!
Yes, perfect timing. ![]() Glad it worked well for you. Happy assembly
Glad it worked well for you. Happy assembly ![]()
Be very careful with the spacer for the antenna holder. It will not go into the hole of the case fully. Do not try to force it.
I accidentally broke mine, and now a piece of screw is stuck in my case, and I had to mount the mainboard with only 3 screws.
Then there are the spacers for the keyboard. The rectangular 3D printed pieces. Those aren’t documented (or at least were not documented when I assembled my laptop), but their purpose is to prevent the keyboard from touching the mainboard while typing. I only learned about this after I had assembled the rest, and since I don’t get the shorts those pieces should prevent, I never bothered to remove the keyboard again and put them in.
This is the first time I hear of this issue. Would you mind sharing a picture of the situation? What exactly broke off?
Quite the opposite. The spacers are there so that the keyboard does have physical contact to the motherboard via the spacers. Without the spacers and the physical connection they create, typing on the keyboard feels “hollow” and the keyboard will bend a tiny bit downward which is not a nice typing experience.
The spacers are not preventing any shorts. There are no open contacts on the bottom of the keyboard or motherboard, so nothing should short. If you are fine with your typing exerience then you do not need the spacers.
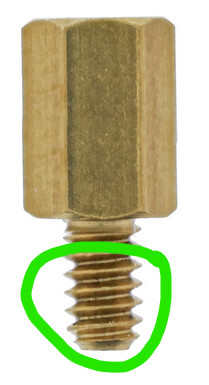
I applied too much force while tightening the screw, so the threaded part broke off nearly level with the case. I would need to remove the mainboard again to get a good picture, so I’m afraid this illustration will have to do ![]() .
.
I must have misremembered then, sorry.
Oh shoot! That sucks!
I would’ve bet that the thing to give up first would be the threading of the aluminum case and not the steel screw. That sucks. ![]()
Congrats on getting the kit! I got and built mine around last June.
I only had prior experience with adding more RAM and storage to laptops and never anything this involved with assembly. I watched this youtube vid: https://www.youtube.com/watch?v=DKzDzDmst2Q MNT Reform: unbox, assembly and first boot, by random cryptix things
before i started building.
It is old, but still relevant.
I second the mention of being careful when connecting the flex cable for the OLED display and installing it into the chassis.
Also generally, for anything that takes multiple screws to install: bezels, Mobo, keyboard, etc. try to generally loosely install all screws before tightening down any particular one. This will allow things to find their location in the assembly.
Also, take your time, re-read steps in the instructions if needed, etc.
Have fun! I learned a lot about how a laptop can be made like desktop PCs have been for decades.