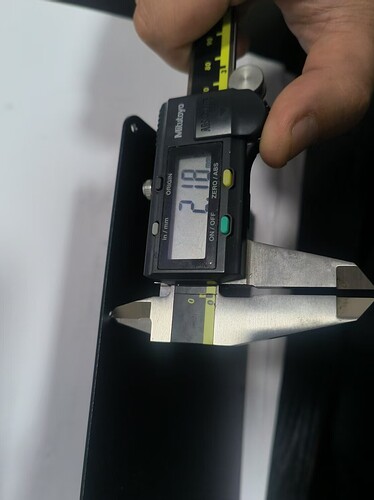
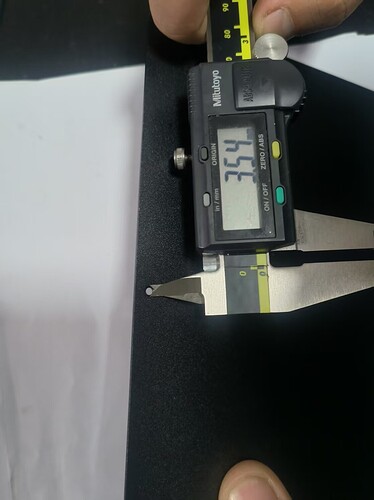
What finish would people use as a best match for the black pocket? Anodized I was assuming but I am second guessing myself.
I think I used 1.5 mm and it is quite sturdy. I am gonna upload my file including the laser engravings in the next days sometime
I designed it with 1.2 to match the recess on the Pocket Reform lid and the keyboard surround. Happy to do an updated diagram with 1.5 if there’s a want.
Pretty sure you want anodised black, yes.
My lid is in the final stages of production. Eagerly awaiting it! In the meantime I’m starting to think about the design of the “upgraded” lid I was considering. Here are a few features I’d like to incorporate if possible:
- MNT logo (embossed or recessed) either in the center or tastefully offset
- Magnet grid (recessed holes for small neodymium magnets) on a portion of the exterior, at least over by the USB ports - will require extra thickness
- At least one square space on the interior with threaded holes, matching the spacing of the Reform Next grid, probably over the expansion slots
- Rectangular through-hole that can be filled with 3D printed plastic or other material, so an extra patch antenna (for LoRa or whatever else) can be placed behind it
I am only really familiar with OpenSCAD, so I’ll probably be using that and making parameterized models so each feature can be optional. For the antenna I looked into folding SMA antennas and small “puck” antennas, but I couldn’t find any that would either fold completely flat or which had a short enough pigtail. So an additional patch will have to do.
I’d welcome any thoughts or suggestions on this before I start working on it.
Edit: apparently OpenSCAD doesn’t produce true curves and isn’t appropriate for CNC models. Now learning FreeCAD…
I got mine anodized black and bead blasted. It’s a little more matte than the stock plate. I’m sure just anodized black will look good too.
Thanks a lot, I will keep you updated. It looks like my only choice to not “lose” my order is to skip sandblasting so I will try that.
Just received my backplate and immediately installed it. It fits perfectly! It came with some small scratches which I don’t mind and I will miss the pretty MNT logo. Maybe I’ll try an MNT sticker…
Current running some parallel build processes to heat it up and it seems to stay between 50°C and 60°C instead of jumping to 80°C almost instantly and creeping up to 90°C. WIFI reception is fine too but I did not really have problems with that.
This is awesome and I’ll be running full power again (I was using cpupower frequency-set -g ondemand -u 1.60GHz to keep the temperature below 70°C). Next I’ll try and compile librewolf (guix build) and see if it stays cool…
Thank you everybody here! Especially @pandora and @jbmorley for sharing their knowledge. ![]()
That would be great! ![]()
…especially since I have not yet figured out what is needed for the laser engraving to work: are such surface features included in the CAD drawing or separately as eg SVG? If the former, how does one mark something as surface feature and if the latter, how does one specify the area? I could not find any clear instructions on PCBways pages so far ![]()
[Edit] never mind, on JLC’s pages this became much clearer to me! [/edit]
I am still new to making physical things from CAD and feel quite clueless ![]()
Thank you again @jbmorley for the files. The backplate came in from PCBWay and the fit is perfect. I chose black and it matches the rest of the black case very well; it has more texture than the rest of the case, but I like it that way.
I got mine and fitted it today too. Tried running FreeTube with a video (running smoothly at 720p - higher worked fine, but stopped/started after a while), while playing MineTest and with the browser open - tested with watch sensors and the temperatures didn’t seem to go over 44c (with the RK3588). I haven’t tested it yet further away from the wifi router, but the signal does seem better so far.
One slight thing I’d like to see improved is that the screws don’t quite sit flush against the new backplate. But other than that it’s fantastic!
I think this means they didn’t countersink the holes correctly — I used @jbmorley’s instructions and mine sit perfectly flush so I think “to 3.5mm 90 degrees” is exactly right
Ah, that’s annoying.
An update regarding my order from PCBWay, and unfortunately they fell short for me. I tried once, and it came back and the screws couldn’t go flush, and I asked them to redo it and went through a long conversation first with them wanting me to confirm what the problem was, and others with wanting to confirm the details.
I said a couple of people here managed to get it perfect from your instructions and was perplexed how they couldn’t manage it for me.
Long story short, I received the “updated” version today, and it’s the same - the screws just don’t fit.
So I’m not sure what’s wrong, but have two takeaways from this:
- I’m unlikely to use PCBWay for CNC again
- I’d rather have a version of the CAD file that’s properly adjusted from the offset for the screws, than faffing / arguing, and ultimately disappointed with attempts for companies to fenangle it to fit correctly.
For those here who it has worked, I’m sincerely glad it worked, but I cannot recommend this configuration / order for others who have not done so yet.
Do you have a pair of calipers? I’d be curious if you could tell what went wrong, could you measure the outer diameter of the countersunk holes? I suppose the corner of a piece of paper would tell you if it’s countersunk to 90 degrees.
If it’s some other standard metric profile I bet you could find other screws that will fit.
Unfortunately I think this could be just as error-prone — I think countersinking / counterboring, especially for screws this small, is usually done as a separate step and care still needs to be taken to follow the technical drawing / CAD file / CNC notes.
After measurement to confirm, if you can borrow a drill press then you could probably salvage the order with a countersink bit. I may have just been lucky with my order. Given the issues some have had, I wonder if they contract out their CNC business to different shops since it’s not their core business. That would explain the variance.
They provided the following images that I annoyingly said “look perfect”… (it sort of looks like they followed the instructions to me)
This was with the second attempt, so I can’t really fault them for trying, and they did try to work with me to get it right - and yes, I’m sure they outsource it. I ranted about other orders being perfect that PCBWay had completed, but that fell on deaf ears!
Well, I have two of them, so might be able to work something out - if someone here wants one with small holes to play with…
Given the tight tolerance I wonder if the coating could be getting in the way. Maybe try some sanding inside the countersunk area?
I bet a needle file would be perfect

