Trackball Replacement Cup with Bearings

Inspired by nfeske Trackball smoothness I decided I wanted to modify my open trackball to improve the smoothness. However instead of modifying the one that came with my reform I wanted to model and 3d print my own.

The original trackball cup from the reform is open source, however it was modeled in Autodesk Fusion 360, and I wanted to work with something open and easily tweakble instead. So instead I took measurements of my original trackball and modeled a work-alike in OpenSCAD. Into this model I increased the gap around the ball to the cup, as well as made pockets for 3x 2.5mm chrome steel ball (bearings) to sit in. My model and code can be found here:

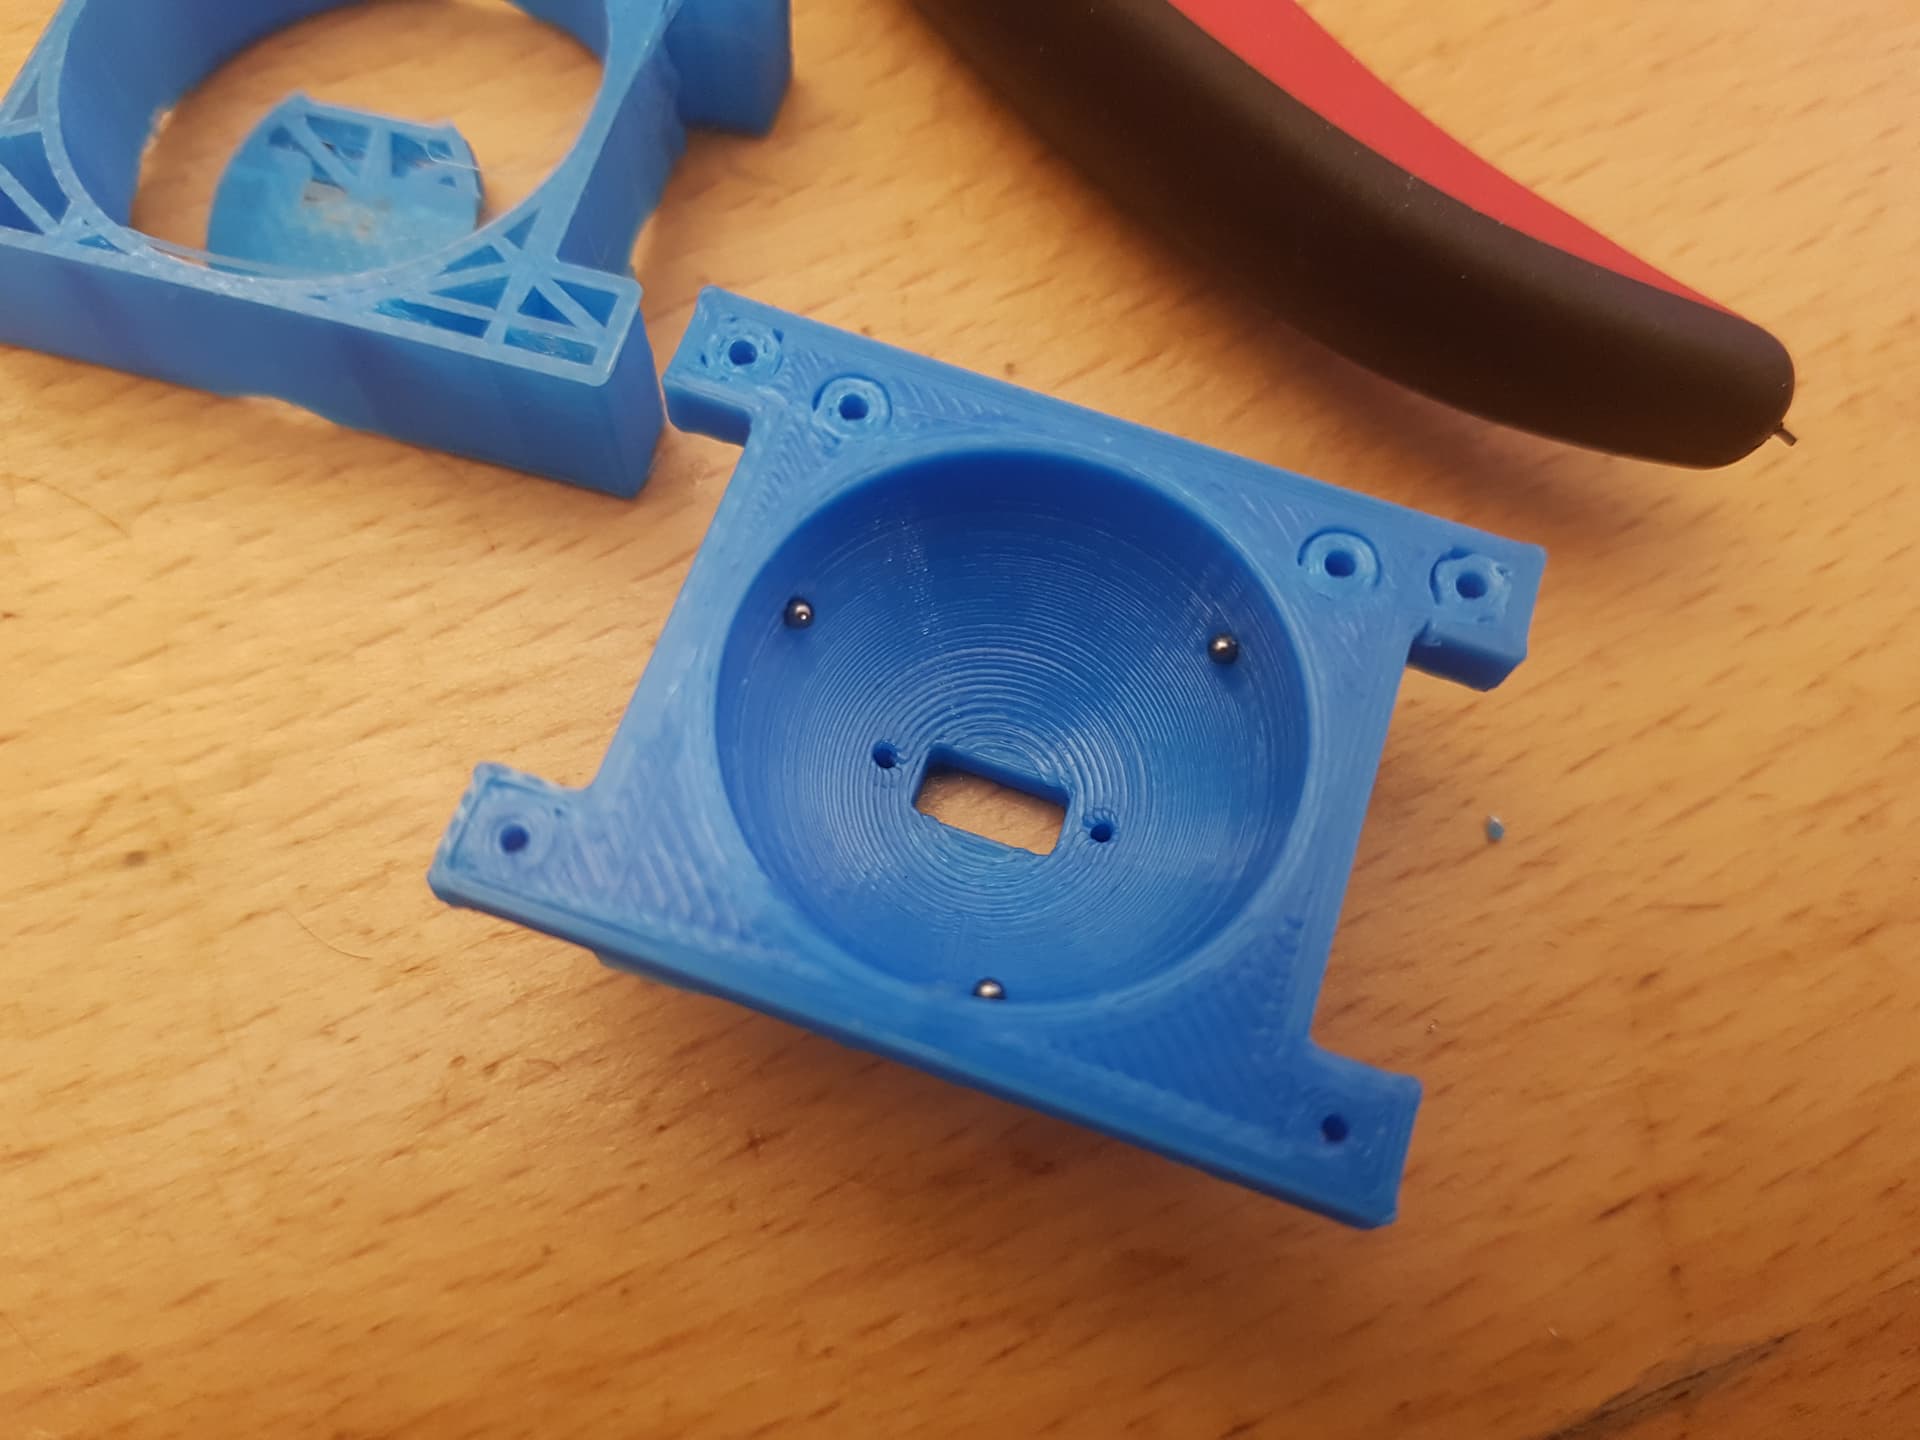
After the first design I determined that the pockets for the bearings were too small as a result of inaccuracies in the print, and tollerances. The second design added 0.3mm to the diameter of the holes to allow for an easy fit. However I found that the placement of the balls and the wider cup design had an unintended side effect. The trackball could be pressed from the side and “ride up” the balls, as well if the laptop was used at an angle it would also do so.

For the third and current attempt I moved the balls up much higher in the cup, resulting in a 22 degree contact angle with the ball, rather than my original 45 degrees. I also reduced the 0.3mm tollerance diameter down to 0.25mm.

The chrome steel ball bearings are super glued into place and care is taken not to get any glue on the contact surface, though if you do it can be simply scratched off. I used 2.5mm GCr15 ball bearings from this seller High Quality Precision Steel Chrome Ball Ball Bearing Smooth Ball Dia 1mm-30mm | eBay though any similar 2.5mm bearing should work, be it chrome steel, ruby, or glass. The OpenSCAD file is also adjustible to any size of ball bearing, though you may need to adjust the cup_diameter inward for smaller ones so they’re supported more.

In my opinion this new model creates a significantly smoother trackball experience akin to some older model trackballs I have. It’s not as smooth as my Logitech trackballs but I put that down mainly to the ball material (delrin) and lack of weight as it has a bit of a scratchy sound. The Logitech mice also use ruby bearings which may be smoother. It’s still miles smoother than the stock design, and should hopefully have less issues with dust buildup over time.

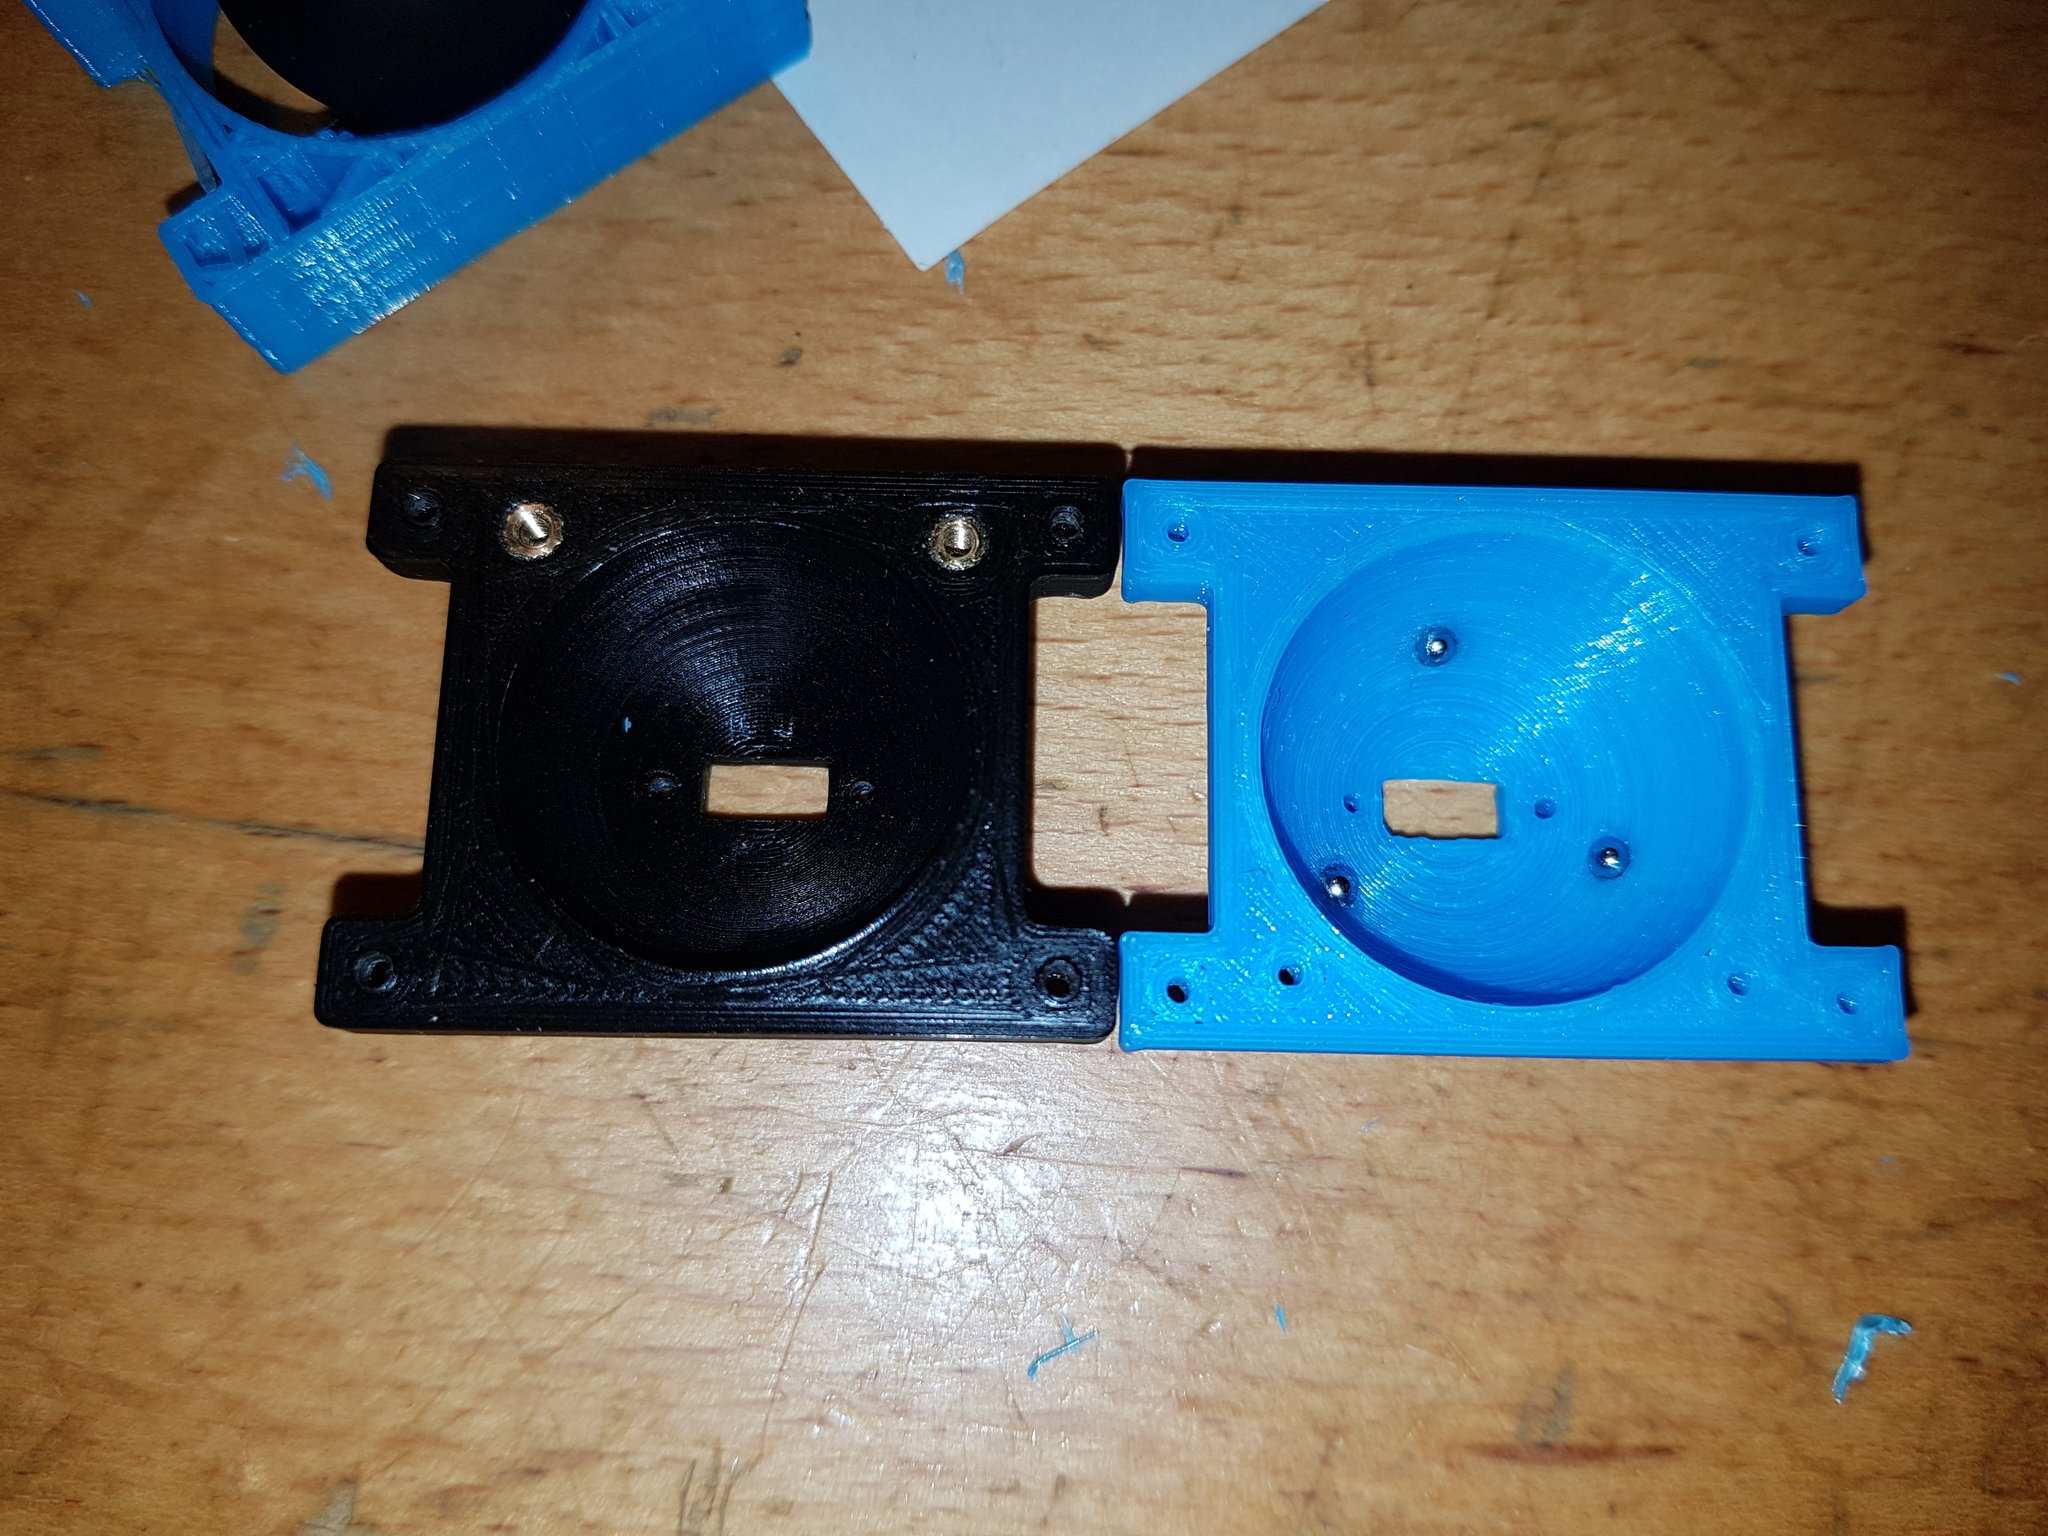
First revision of the model with the low (45 degree contact) mounted bearings, next to stock:

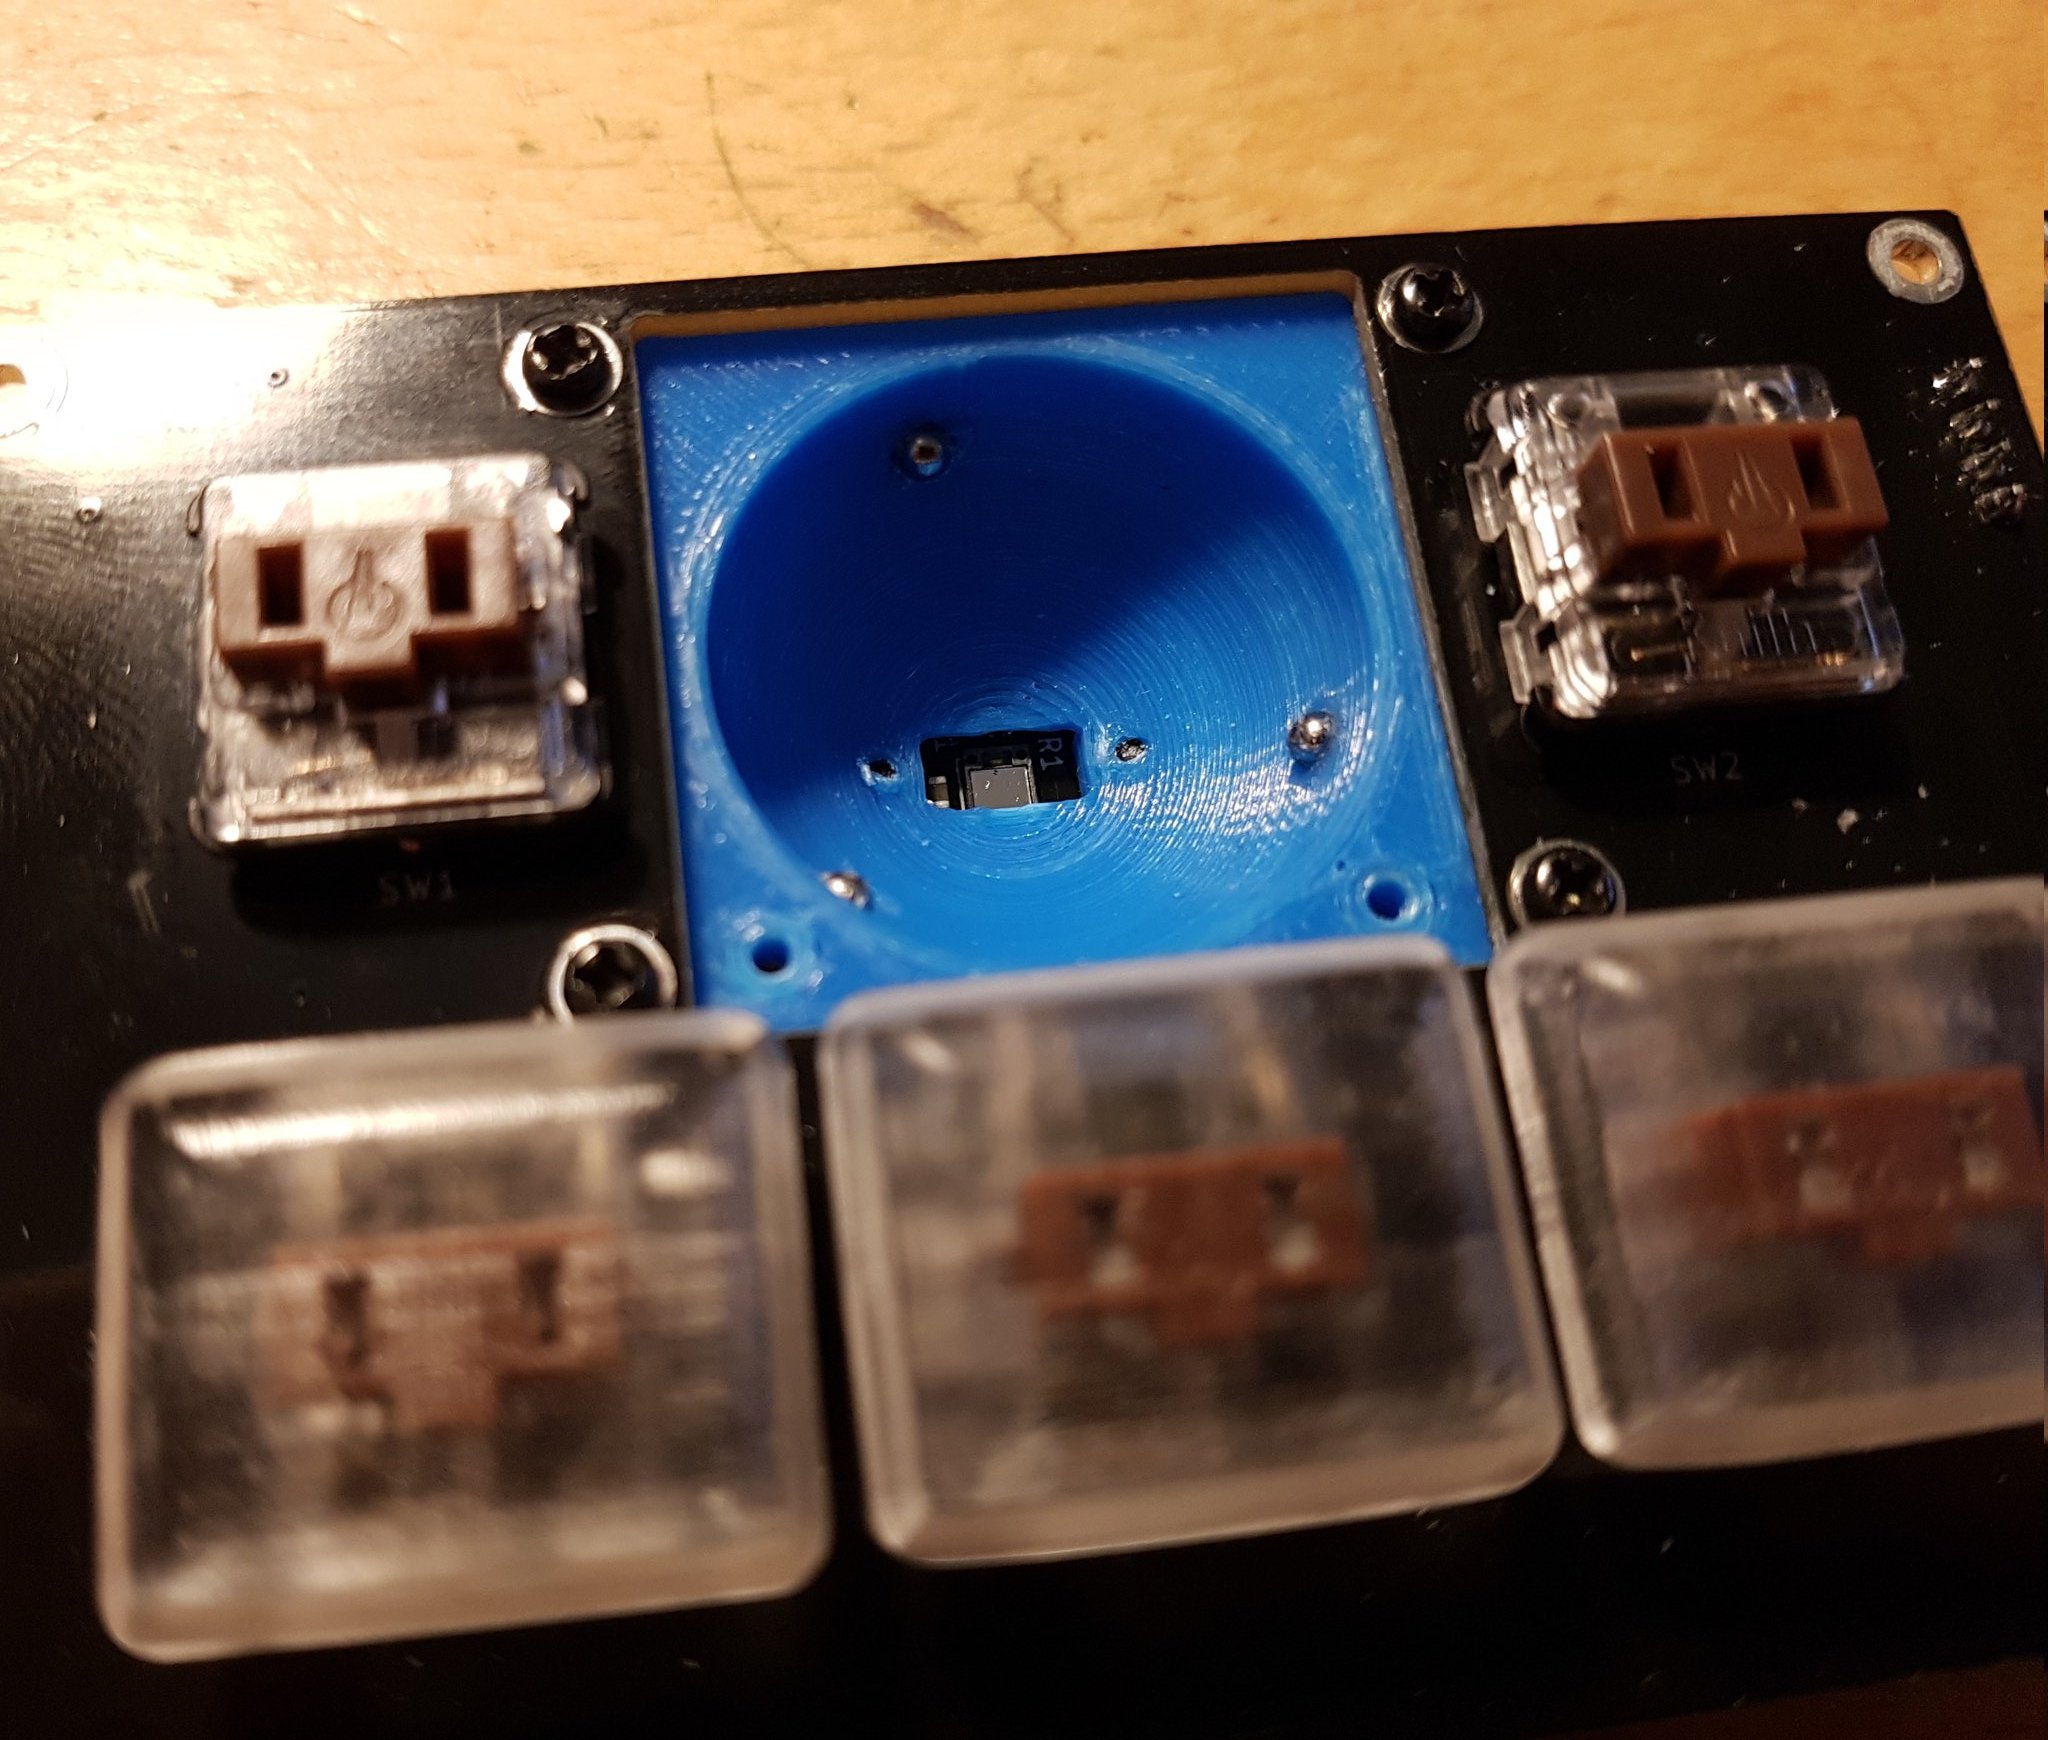
One small difference is my model does not use threaded inserts for the top retaining ring mounting as I did not have any available, though there is an untested flag in the code to widen the holes to support them.

Current revision with the high contact angle:

7 Likes

Thank you for sharing this. I’d been thinking about making an OpenSCAD version myself for exactly this purpose, and am happy to see someone has saved me the trouble! :smile:

I have some 1.5mm steel balls and a 25mm steel ball (to experiment with replacing the delrin ball) arriving in a couple days. I’ll adapt your design to fit the smaller balls and then report back.

I’ve also got 1.5mm bearings and am curious as if they’ll have a different feel as well. So I’m currently printing a variant as well to test.

My settings changed for the test are:
bearing_dia = 1.5
cup_dia = 26.5
bearing_fit_dia = bearing_dia + 0.20;
cup_thickness = 5.2;

EDIT:
Just testing out the 1.5mm bearing variant. The settings work and the ball is held. Though not certain it’s any quieter (and may actually be louder) than the 2.5mm ones. Though with the smaller bearings it’s possible that some superglue got on the outside, and in removing it I scratched the contact point? Either way these settings do work and work quite well. It might just be that the other one “wore in” removing and surface debris and got quieter. I’l probably leave it in though.

2 Likes

My bearings arrived! I put the 25mm steel ball in first just to see how it felt. Very smooth and satisfying, but the sensor couldn’t detect it!

I decided not to use any glue at all to secure the bearings. I used a magnetic screwdriver to carefully place the 1.5mm balls in their pits, then put the delrin ball on top and carefully screwed the retaining collar back on over it.

I confirmed that the bearings were still in place once I had the collar screwed down by looking for them glinting in the light coming in from the gap between the collar and the ball. Then I shook the whole thing around a bit, turned it upside down a few times, rolled the ball around in various positions, and confirmed that the bearings were likely to stay in place so long as the collar remained on.

It’s buttery smooth and I’m quite happy with it. This is what I’d been hoping the trackball would be like. Granted, I’d not used a trackball in a very long time before this one, and I do seem to recall the Logitech ones having a bit more “glide,” but with the mod I find the trackball perfectly adequate. It doesn’t stick anywhere and it takes very little force to move it with my thumb.

I printed the new cup in white PLA, 15% infill, 0.15mm layer height, oriented with the open side of the cup facing up, with supports from the build plate only.

One caveat: I think I might have damaged something while I had things open. After reading about people frying traces removing batteries, I decided to disconnect the battery banks from the mainboard entirely. Now I’ve got some nonsense readings in the right column of my battery info. (Showing, from the top, .2 ???%, 0.2, 5.3 0.00A, 3.2 26.13V) :grimacing:

I’m hoping it’ll right itself after some time charging, as it did the one time I left my laptop on and unplugged overnight. :crossed_fingers:

Edit: Charging it for a while and then discharging for a while seems to have fixed the battery issue.

Glad to hear it worked out well for you! I’m surprised that the sensor couldn’t handle the ball bearing. Maybe your one is just too smooth with not enough details to pick up on. You could try lightly sanding it to give it a more buff appearance. I’m surprised you managed to keep the 1.5mm balls in enough to get the trackball in, but that’s a good solution too. Glue should work just need to be careful to not get any on the front side of the ball.

As for the battery I’ve disconnected mine many times. I remove both connectors from the motherboard then remove the cells. After plugging it back in the charge will show ???% until it’s fully charged again, since it won’t know the charge state properly. I don’t believe it matters but maybe check that you didn’t swap the left and right connectors.

1 Like

Yeah, it was tricky getting them to stay put! Took me about three or four tries. I took an eyeglass screwdriver, stuck a couple 8x2mm magnets on the butt, picked a bearing out of the bag with the tip of it, and pinched it off with my thumb once I had it in the pit. Had to really keep a steady hand to make it work. :grinning_face_with_smiling_eyes:

Thanks for the advice regarding the batteries. Seems to have worked itself out as you described.

Once you get one into a pit, could you use Blu Tack or similar to stick a strong magnet behind it on the outside of the cup? This could perhaps hold each one in place while you work on getting the others in, the ball on top, and the collar back on.

1 Like

Yup, I suppose that might have made things a bit easier! :rofl:
Especially if I’d just taped the magnets to the outside at the beginning. I imagine they might’ve helped guide the balls into the pits as well.

Really love this mod. I’m just sitting here flicking the trackball with a stupid smile on my face as it "ssss"es away. :stuck_out_tongue:

Thanks again for the OpenSCAD stuff, @Chartreuse. Made this a lot easier.

No problem. I too am enjoying how smooth it is. I’ll probably try another print without glue, but I think that my fears were unfounded (after a fair bit of cleaning) and that’s just the sound delrin on steel makes.

EDIT:
For the 1.5mm variant I described I’m thinking the ball might be sitting just a little too high in the socket, could be worth tweaking it to move it slightly down from center. (Or oversize the bearing holes slightly more so it drops down).

1 Like

I had occasion to remove my trackball again today as a bit of debris managed to work its way under the ball and onto the sensor. Decided to try the steel ball again, and I suppose something must have gotten onto the sensor when I tried last because it did work this time!

I learned that the delrin ball is a lot better than the steel one when the bearings are in. The steel ball with the bearings is a lot scratchier and a lot harder to get moving.

Edit: FWIW, the 25mm and 1.5mm balls I’m using are grade 10 bearings.

For using the steel bearing it might be worth trying to find ruby bearings instead? Perhaps they’d be smoother against the steel.

The bearings I’m using are GCr15 which probably isn’t the best quality, but are chrome steel like I was looking for. Chrome steel should be a little smoother. Guessing the steel on steel is just too rough, could be worth trying some teflon dry lube on the ball and bearings to try and improve the feel.

Glad to hear that the steel ball works from the sensor data sheet it seemed like it work as it’s meant for industrial sensors.

To be honest, I’m pretty satisfied with what I have now with the delrin + unsecured steel bearings and am unlikely to pursue further improvements at this point. I can already send the cursor flying across the whole screen with a flick of the thumb, which is a significant improvement over the stock trackball. The smoothness of the trackball is no longer the primary “quality of life” concern for me here, even if I suspect I may be able to achieve something slightly better with a different setup.

The speakers are now my primary targets for improvement where hardware is concerned. They’re loud enough with the volume cranked up in pavucontrol, but they’re also a bit tinny/distorted sounding. I’d like to figure out how to get something better sounding.

Edit: Never mind about the speakers. I figured out how to get the soundcard selected in alsamixer (F6, says so right in the UI :stuck_out_tongue: ) and turning up “Playback” all the way gets me nice, loud output without all the distortion I was getting from just turning things up in pavucontrol. Getting louder built-in speakers in place would require a lot more power anyway, and seems it would require swapping out the sound chip as well (it’s designed to drive 1W 8Ohm speakers).

1 Like

Thanks @Chartreuse for creating the OpenSCAD code! I printed the new cup upside down (PLA, 15% infill, 0.15mm layer height) and without supports.

I decided to try the modification with freely moving 2.5mm ceramic ball bearings. To assemble, I held the bearings in place with little strips of electrical tape, dropped the trackball in place, and then gently pulled out the tape while holding the trackball.

I don’t know how they compare to steel ball bearings, but it’s a dramatic improvement over the stock trackball.

Unfortunately, I had some bad luck reassembling the trackball assembly. One of the screws snapped off when I was tightening it. I’m going to reprint the cup with slightly wider screw holes.

More seriously, I also managed to damage the optical tracking chip! The top of the chip separated from the unit at some point. I don’t think this piece is electrical, so I’m hoping to reattach it with some tiny dabs of epoxy in the corners. Anyone have suggestions?

I don’t see why a tiny bit of epoxy wouldn’t work, so long as you’re careful to keep it off the sensor. If you try, let us know how it works out!

I reattached the top portion of the sensor with a bit of epoxy yesterday. I reassembled the laptop this morning and everything seems to be working fine!

2 Likes

I got one of the revised cups that Lukas is using in the latest built Reforms and…WOW! I didn’t mind the original style trackball cup but it’s a huge improvement. Mad props are due to @Chartreuse

1 Like

Are they available to order now? I fancy the upgrade myself.

1 Like

Yes, the trackball cups available in the MNT shop now include 2.5mm steel ball bearings MNT Reform Trackball Cup - MNT Research Shop