Broken trackball key tabs

I guess I’m really not lucky…

It’s the second time this week that I’ve had to unscrew the trackball top cap, remove the ball and carefully clean the sensor at the bottom because any piece of dust or debris, however small, will interfere with the trackball.

The problem is, to get to those screws, I have to remove the two side key caps. I tried to lift them straight but apparently they\re more fragile than I thought and one of the tabs broke off in both of them :frowning:

Can those key caps be ordered as replacement - and I suppose, the keys too, because the broken tabs are stuck inside one, and it doesn’t look like I’ll be able to pull them out?

I’ll try to repair them and glue steel tabs to what remains of those key caps, and hopefully I’ll be able to get the broken off tabs out of the keys. But if I have to clean the trackball twice a week, this is sure to happen again soon.

2 Likes

I’ve had success just turning over the laptop and spinning the trackball to get the dust out. No disassembly required.

1 Like

I’ve had that happen so many times. Pretty annoying.

First thing I’ve found is that one can remove the remainders of the keycaps from the keys using something with a very sharp tip. Needs a bit of patience but works every time.

Second thing is that I’ve stopped removing the trackball. Now I just blow at it hard. That’s usually enough to dislodge the dust.

Finally I’ve had a friend of mine print me keycaps from a less brittle material using his resin printer. They’re black now instead of transparent, but in return they don’t break off as easily :slight_smile:

I tried it. It didn’t work.

The both times I opened up the trackball, the piece of dust was microscopic - and I mean literally: I saw it under the microscope, because it was all but invisible to this gen-Xer’s naked eye. Both times I tried to dislodge it with an air can and it didn’t move. I’m guessing it wasn’t dry dust but something greasy off my fingers.

I thought of printing new ones with a filament printer. The prongs are 1.2mm x 3mm x 3mm, and I’ve printed thinner and longer stuff that was fairly durable - including the glasses I currently wear - out of PETG. But it’ll just delay the inevitable.

So what I’ll do is, tomorrow I’ll file U-shaped steel inserts, I’ll mill a 1mm deep pocket under the broken keycaps and I’ll epoxy the inserts to the keycaps. That’ll take take of the problem permanently. Assuming I manage to pop the broken tabs out that is…

This is what I did when my left trackball button’s dinky little tabs snapped off.

Print them on edge with supports so that you don’t have a single layer making the tabs fragile.

Wow, interesting to read these experiences. I am using the classic Reform as my only laptop since 2023 and I also have to clean the sensor of the trackball regularly. Probably as often as I was cleaning the sensor of my ball-mouse back in the day. Each time I clean it, I remove both the left and the right trackball button but even though I have had to clean the thing maybe once per week for more than two years I did not have their legs snip off. And I’m not even particularly careful but just lever the thing off its key switch.

Maybe the problem is that the new super transparent trackball buttons are more brittle? I still have the milky ones that were SLA (I think?) resin printed and those also look brittle but apparently survived my treatment so far…

In IRC, minute linked to these instructions for custom MBK keycaps: GitHub - infused-kim/kb_keycaps_trackpoint: Scripts to generate keycaps with a cutout for a trackpoint My plan is to also piggy back the round mouse keys as part of an order at JLCPCB. I can let you know how that went.

I don’t know how the trackball’s sensor works exactly, but I suspect it’s doing image processing that’s too clever for its own good.

The Kensington Expert Mouse trackballs I’ve used since the late 80’s use a standard, el-cheapo optical sensor mounted at the same location under the ball, augmented by the subtle dotted texture of the ball probably, and it’s phenomenally resistant to dirt: I clean my trackballs once a year, when they starts feeling a little “draggy” - not even outright malfunctioning and requiring immediate attention all of the sudden like the Reform’s - and when I remove the balls, I usually found mountains of fluff inside the trough that has finally covered the sensor’s window. One quick wipe with a dirty finger is enough to get it going again.

It takes a lot to disable those trackballs: I really don’t understand how the Reform’s can be this much more intolerant to dust than proven, solved technology from 3 decades ago.

But I did notice one thing: the Reform trackball’s sensor seems to be sitting naked at the botton of the trough, while the Kensington Expert Mouse’s is behind a window. And I’m wondering if the only real difference is that the fluff is less visible to the sensor as a result of not sitting on a critical optical plane or something.

This theory is easy to test: all it would take is pushing the sensor’s PCB down a bit with washers and sticking a piece of scotch tape on the hole, and see if the trackball stops being so picky over time. I might just do that.

Well, it’s sunny outside, I don’t feel like spending two hours in the workshop machining tiny parts, and I need to ensure OrcaSlicer ARM64 is stable and get used to it anyway.

So laziness got the best of me: I sliced two pairs of replacement keys and I sent the file off to printing on the printer at work, to print them out of white PLA. And then I’ll cycle to work with the laptop to try them out :slight_smile:


1 Like

Okay, it’s all fixed up!

Here are a few photos:

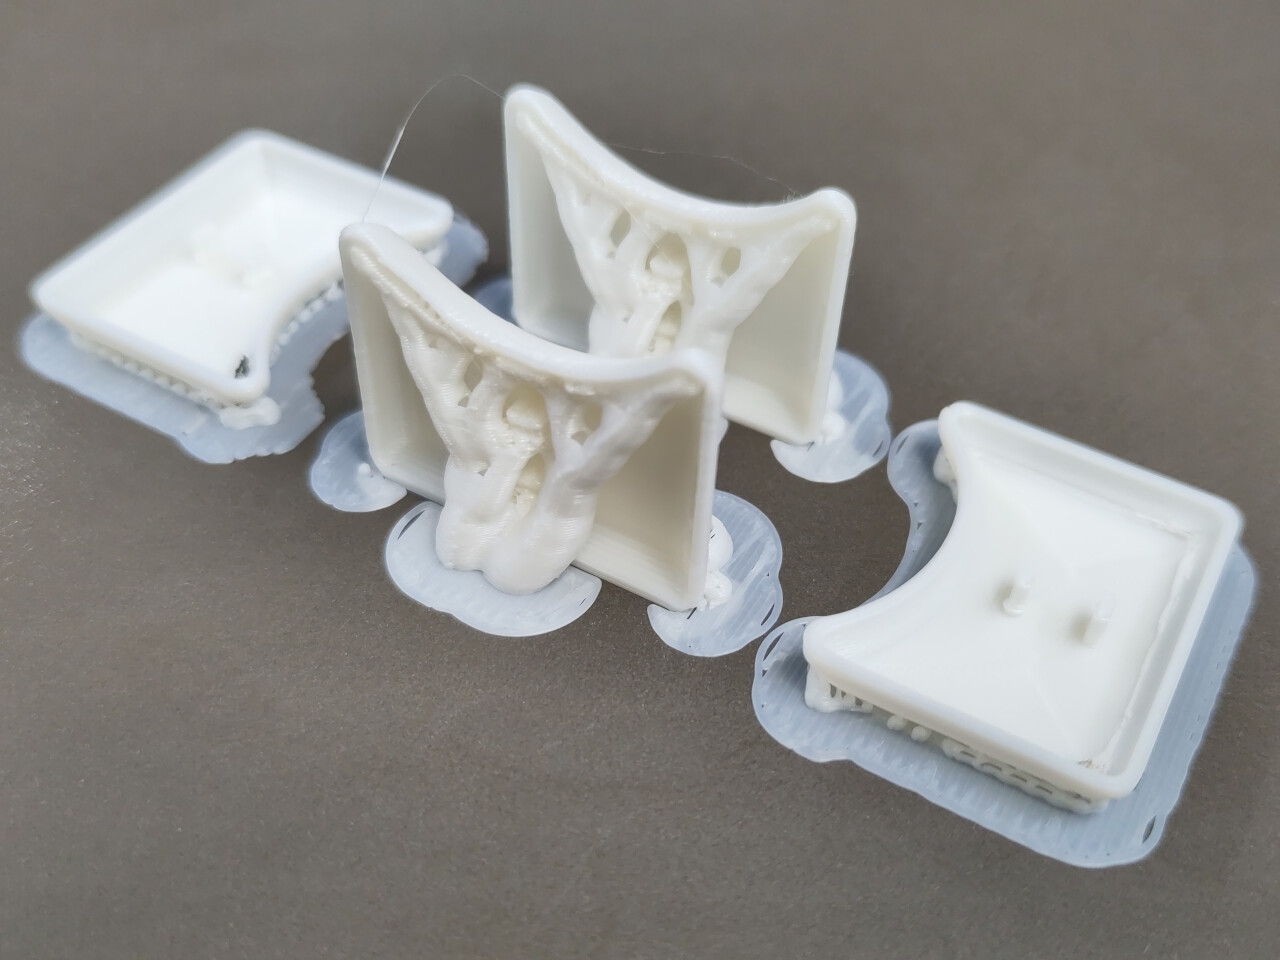
I printed two sets of key: one flat, one vertically, to compare the tabs and get a feel of how strong they would be depending on how the filament got layered up:

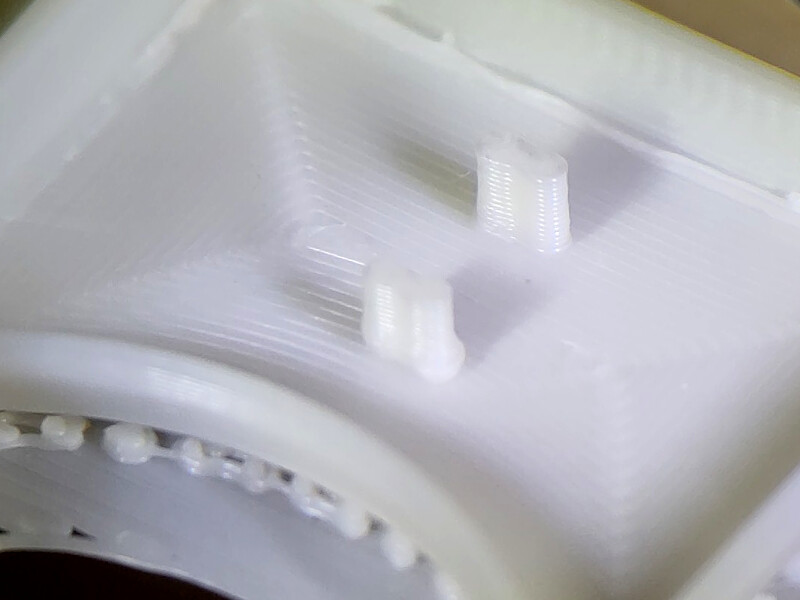
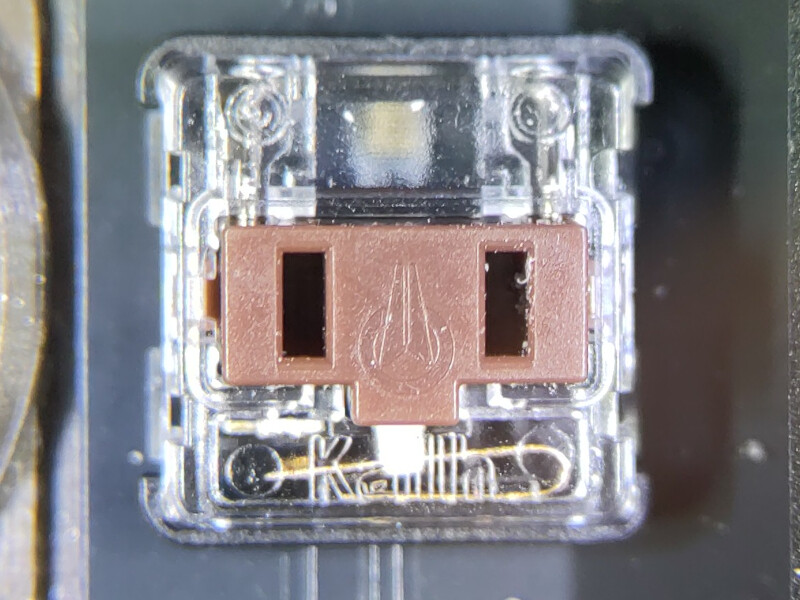
This is how the tabs look under the microscope, for the keycaps printed flat on the bed:

They are more or less dimensionally accurate but they still need some rework. They seem solid, but they’re just a bunch of narrow layers stuck together, so it’s not ideal.

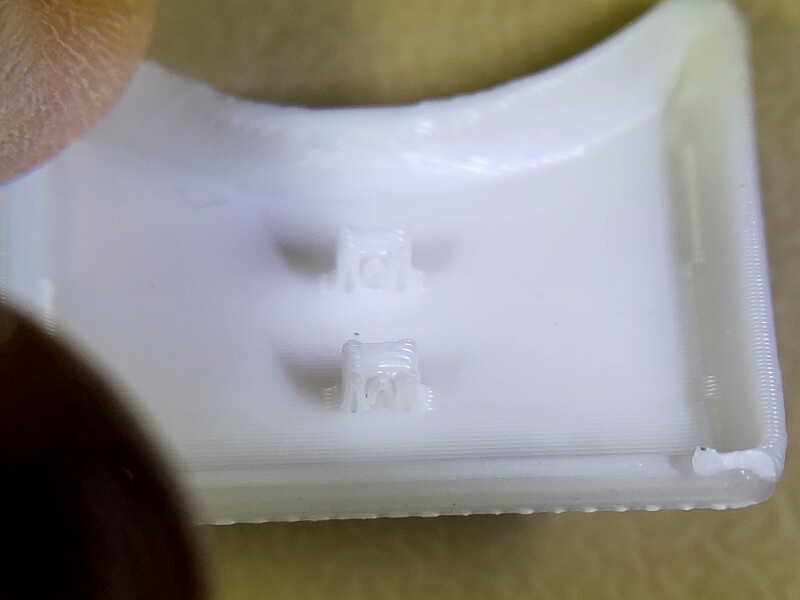
And here, the tabs on the ones printed vertically:

They are not dimensionally accurate and they have these fillets at the root because they’re made of continuous hoops. But… they’re continuous hoops, so presumably more mechanically sound.

In the end, I bet on the latter and reworked the tabs to the correct dimensions with a needle file so they don’t get stuck inside the key’s notches.

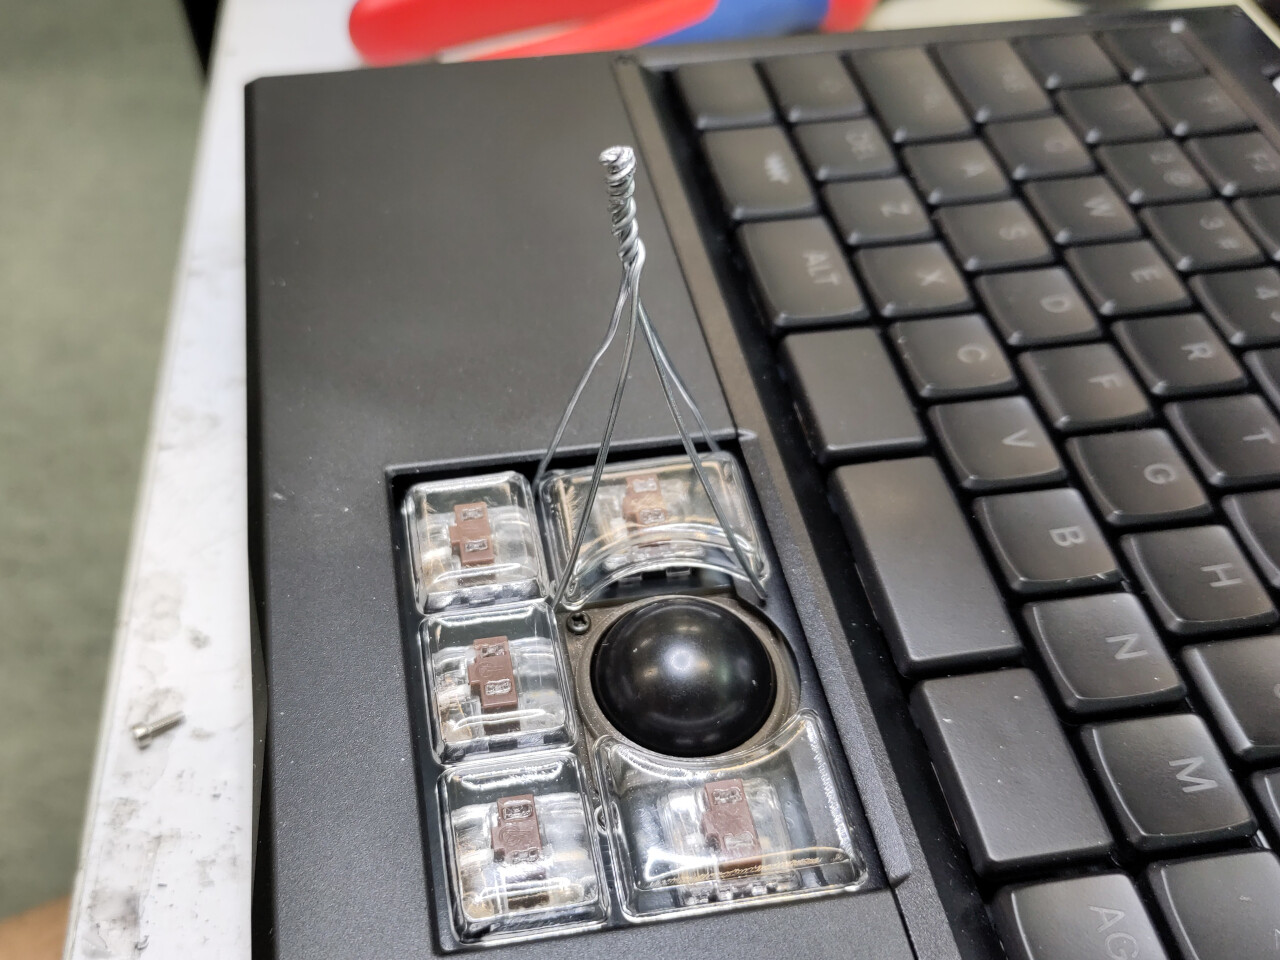
Then I removed the old keycaps, that still held on by one tab. But this time, I won’t be caught dead breaking another tab ever again by wrenching the keycaps out - on these resin keycaps or my PLA ones. So I made me a custom keycap puller out of chicken wire :slight_smile:

It took me 10 minutes to make and it works really well!

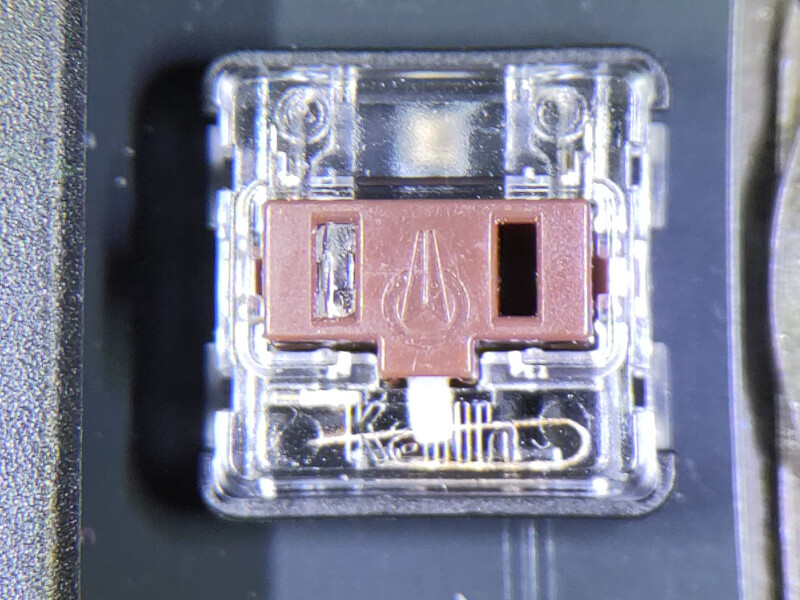
Then I got to work removing the broken tabs from the keys:

The hot needle trick didn’t work and I couldn’t get a thin blade in there for the life of me.

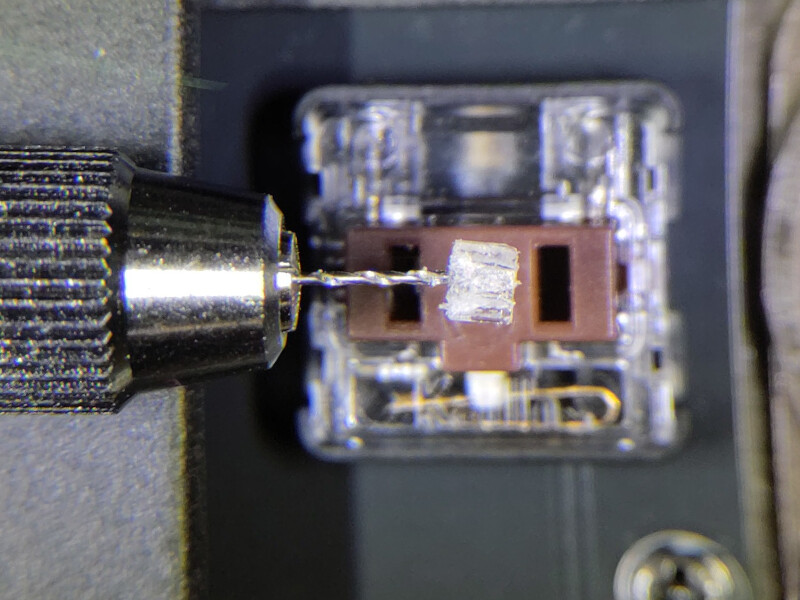
In the end, what worked was drilling half-way through the broken off tabs with a 0.5mm drillbit and a hand drillbit holder (commonly sold at hobby stores to work on scale models), then carefully pulling out the tab with the half-stuck drillbit.

In one case, I had to drill 3 holes to weaken it enough that it came out at the third drilling operation. In the other, it came out first time out.

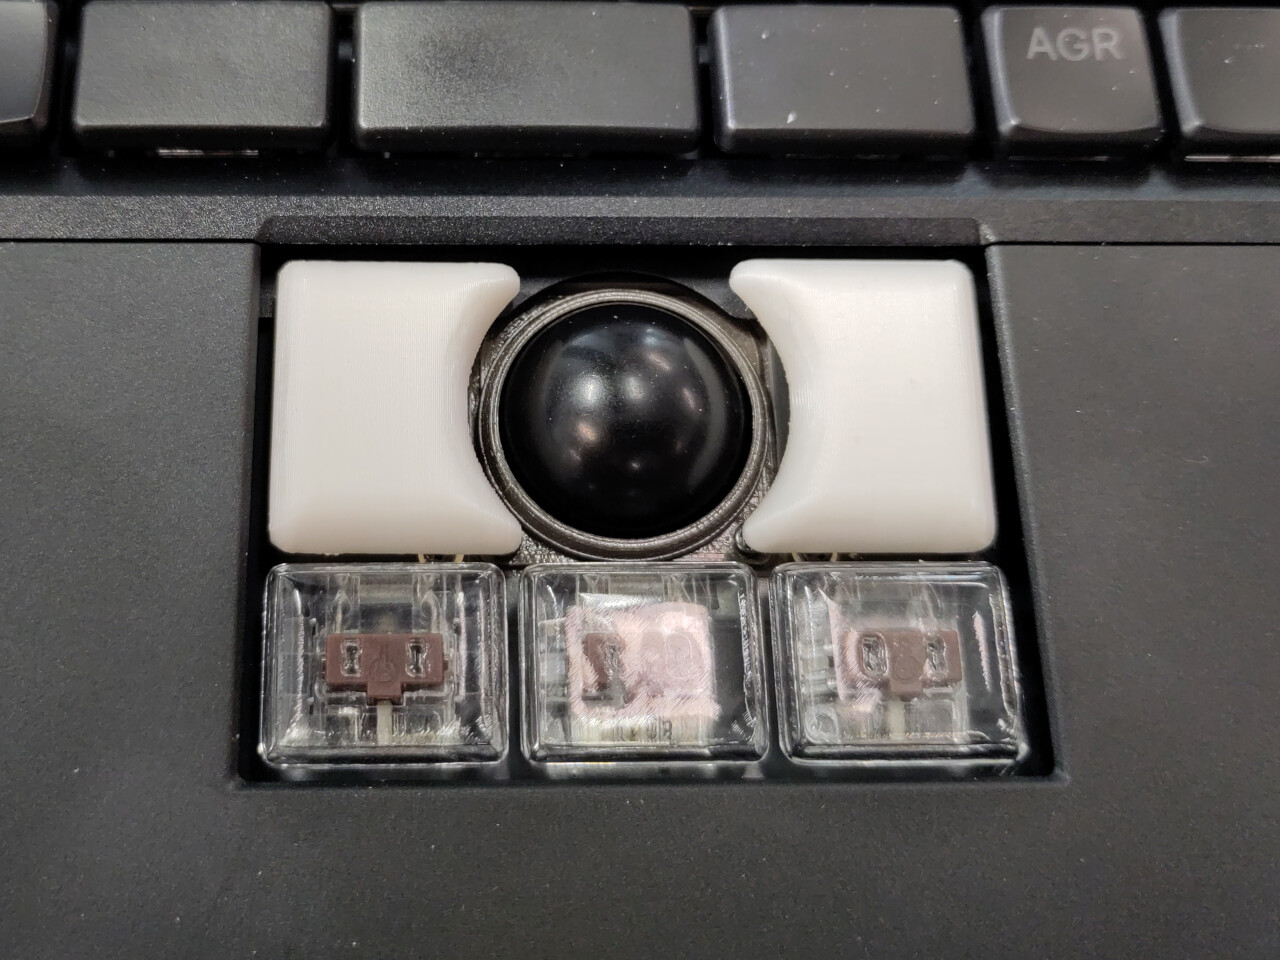
But crucially, came out they did eventually, and they left the keys totally unscathed:

Then I presented my new PLA keys, gingerly pushed them in, making sure they didn’t need to go in forcibly, and they slid right in with just a gentle amount of force. So I’m reasonably confident I’ll be able to get them out without drama, with the keycap puller, next time I have to get to the bottom of the trackball.

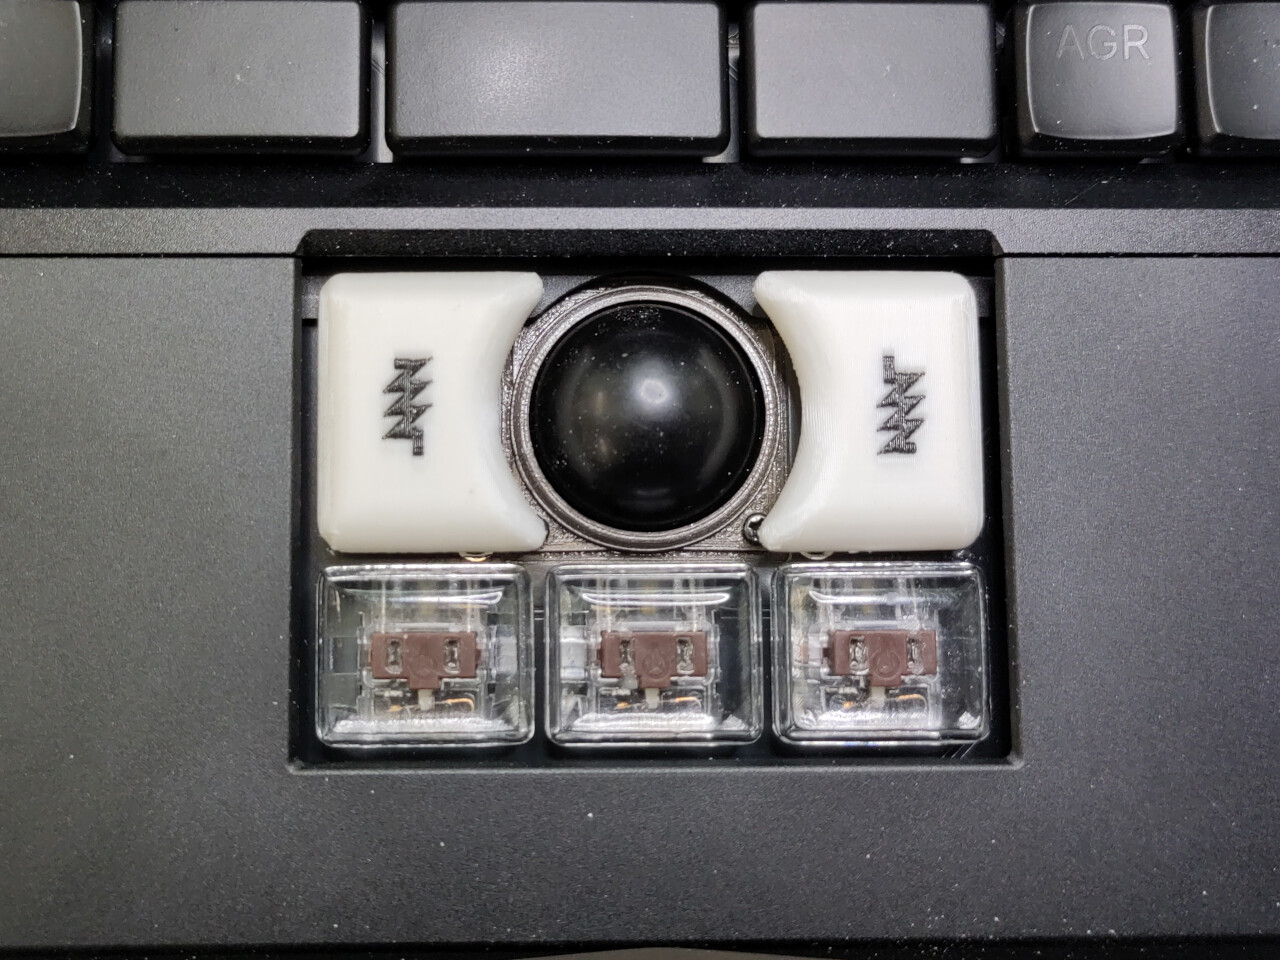
This is how it looks now:

Clearly not original :slight_smile: But I don’t care: it’ll remind me that, while not perfect, the beauty of this laptop is that you can repair it yourself. If something doesn’t work, be it software or hardware, YOU can fix it! That’s precious, and that’s why I don’t mind paying more for a quirky German laptop :slight_smile:

8 Likes

Wow, thanks so much!
The same thing happened to me, so having basically a “repair guide” is amazing.

1 Like

I think the trackball cup’s design just somehow lets too much dirt in. When I clean my trackball sensor, it is visibly occluded by some small dust mote, debris something which covers part of it up. I’m not surprised that the sensor cannot work under these circumstances. Looking at the ballbearings in the trackaball cup I can see tons of dust collecting there. So a lot of things get in there and I suspect that other trackballs just use a better cup design?

Awesome post, thank you! I love that you took the effort of documenting your process with photos even. Thank you for those! My own trials at FDM printing the mouse keycaps with PLA in a Ultimaker were not successful. The keys printed flat on the bed had very weak legs which were super prone to brake off. It was better with the keys printed on their side but the legs still broke after a while and got stuck in my keyswitch. I had much better results with our SLA printer in terms of how tough the legs were but they came out just a bit too big and since my existing keycaps keep working fine I did not yet do the effort of perfecting the SLA printing of the keycaps at our local printer.

As I said in an earlier post, I just lever off the keycaps and that seems to work. From your photos I see that indeed you have the new translucent keycaps. I also have those in my second rk3588 Reform and I’ll let you know if they break similarly easily for me once I need to remove them. But I’ll try to be careful. :smiley: When I want to take off the keycaps of the keyboard I am not using a meta construct like the one you created but I take two simple thin threads or strings and create two loops of them. One loop goes around the top of the key and one around the bottom of the key and then I pull on both loops with about the same force to lift the key off the keycap as straight as possible.

1 Like

I suspect you didn’t have the printing process dialed quite right. PLA (or PETG) isn’t nearly as fragile as you’d think when it’s printed right and the layers are deposited for strength in the right direction.

Case in point: I wear those 3D-printed glasses that I designed myself, and they’re as thin as it gets: at the thinnest sections, the hoops are 2mm x 1.5mm, the nose bridge is 2mm x 2mm, the temple cables are ⌀2mm and the split hinges are 1mm thick with the pin holes printed normal to the layers.

You’d think they’d be super-fragile, but I rarely break them (and usually it’s because I sit on them) and I even sleep with them. They’re perfectly durable for a grand total of 10 grams with the lenses :slight_smile:

For that reason, I’m reasonably confident that those keycaps will last. If they don’t I’ll design something better. Or I’ll go back to my original plan to epoxy steel tabs at the back of the original clear keycaps.

I recreated a CAD model of the circular trackball keycap (at least something close to the original) for three reasons:

1/ I modeled it on the Reform to stress-test it and get a feel of how apt it is at doing heavy CAD.
2/ The tabs could use some extra material to prevent the keycaps from rocking, and I didn’t feel like overloading a “dirty” object recreated from a STL mesh.
3/ I wanted to add an inlaid MNT logo, since the 3D printer has two extruders, and again it’s better to do that on a clean model.

It’s printing now. I’ll take pictures when I get around to installing them in the laptop.

If there’s interest for this, I’ll post the FreeCAD model. It’s not perfect - particularly the “pointy” bits that wrap around the ball - because complex curvy bits are notoriously taxing on resources in CAD software, and my simplified model already brings the Reform to its knees. If I try to do anything more complex, it simply freezes FreeCAD or bogs down the machine for several minutes.

But it’s close enough to the real McCoy that a bit of filing with a needle file should be enough to round everything off nicely.

I reckon they came out pretty nicely.

Those keycaps only required a modicum of cleanup at the top. However, I left extra material around the tabs so I could hand-adjust them with a file to obtain a perfect interference fit in the keys’ slots.

Those keycap are very stable as a result. But they do require 10 minutes of careful filing and some adjuster skills. They’re totally unsuitable as production parts, but as repair parts, if you have the time and you’re handy with a file, they’re great!

5 Likes

Firstly, that new version with the MNT logo on looks amazing.

Secondly, thank you so much for the detailed notes with photos on what you did - not only does it help people who need to repeat the steps but as someone who comes to electronics and building things from a more software background it’s great to see what tools and techniques the more practically minded use!

For my 2c, I FDM printed a bunch of kailh keycaps for a different keyboard project. The crucial part for me after a couple of tests was to use a 0.2mm print head instead of the default 0.4mm that my printer came with. Dunno if that’s going to be the same for everyone else but it seemed worth sharing!

3 Likes

100% seconded! Thank you for your detailed text and photo documentation of your work! :smiling_face_with_three_hearts:

A small remark though: remember that the MNT logo is trademarked and that the license for the logo is CC-BY-NC.

Thank you!

Actually…

This page says the logo is ®️ and specifically NOT CC-BY-SA:

And this page says I can’t use it :slight_smile:

I’ll pull the repo when I get back home after work tonight.

1 Like

As a lifetime trackball user, I suspect like nobody makes a hermetically sealed trackball that’s impervious to schmutz.

In my opinion, the problem with the Reform’s trackball isn’t that it lets in too much dirt, it’s that the sensor is dead center in the bottom of the whole assembly. Gravity ensures that any tiny amount of debris gets deposited right where you don’t want it: on the sensor.

If you pop the ball out of most commercially available trackballs (Logitech, Kensington, Elecom, etc.), you’ll find the sensor is offset to one side and many have a hole at the bottom to allow debris to fall out.

I discussed designing a new cup to relocate the sensor on IRC a while ago and @minute pointed out that the firmware would have to be changed to do the geometry to compensate. Maybe Ploopy’s code could be used as an example? I haven’t tried to understand it.

1 Like

Trademark and copyright are two different things. Saying that the logo is trademarked does not say what its copyright is. Yes, the logo is not CC-BY-SA. The logo is CC-BY-NC as minute also confirmed when we uploaded the MNT logo to Debian non-free in the reform-branding package: Folder: 5 | Debian Sources

Yeah well, the difference between CC-BY-SA and CC-BY-NC is moot as far as my purpose is concerned: I’m not selling the keycap and I don’t care what terms the model is distributed under as long as it’s not commercial.

The key bit here is that I’m not allowed to use the logo in a derivative work.

1 Like