After that, the keyboard didn’t respond at all anymore, not even the OLED menu would react in any way and resetting the keyboard didn’t work. A full power cycle also didn’t help.
Now my device is entirely unusable and I really need it in the coming days.
Hi, sorry for this! AFAIK it doesn’t have to do with the fw updates per se, but there can be some wonkiness with the USB connection to the keyboard that I don’t fully understand yet. Anri had the problem on the weekend that the keyboard would disconnect every once in a while and I proposed to update the FW and the same thing happened that you experienced now: the USB connection got bad in the middle of the FW upload. I’ve also experienced this in the development of Next (still ongoing) where the connection was so bad one day that I wrote a bash loop to just try the upload until it works (sometimes took 10 times). After upgrading the kernel to 6.15 and pressing hard on the small internal USB cable plug of the keyboard, the issues went away. I can’t for sure say yet if it was the cable/connection or the kernel or something else, we’ll look into this more in the next weeks.
Anyway, to recover (and we did this successfully yesterday) you need to overcome the design error that the motherboard has no power on button. To do this you can flash the system controller FW built with the FACTORY_MODE flag turned on. I’ve prebuilt this and just putting this link here for your convenience and will turn it into something official later: http://dump.mntmn.com/sysctl.uf2 (yes, no https there, sorry).
The procedure:
Don’t turn the standby switch off, has to be on, and batteries need to be connected
Open the top back lid
Move the 2 jumpers near the internal USB-C connector (SYSUSB) to the position facing away from the USB-C connector
Unscrew 4x motherboard screws
Lift motherboard and slide a piece of paper or better, antistatic foil/foam underneath
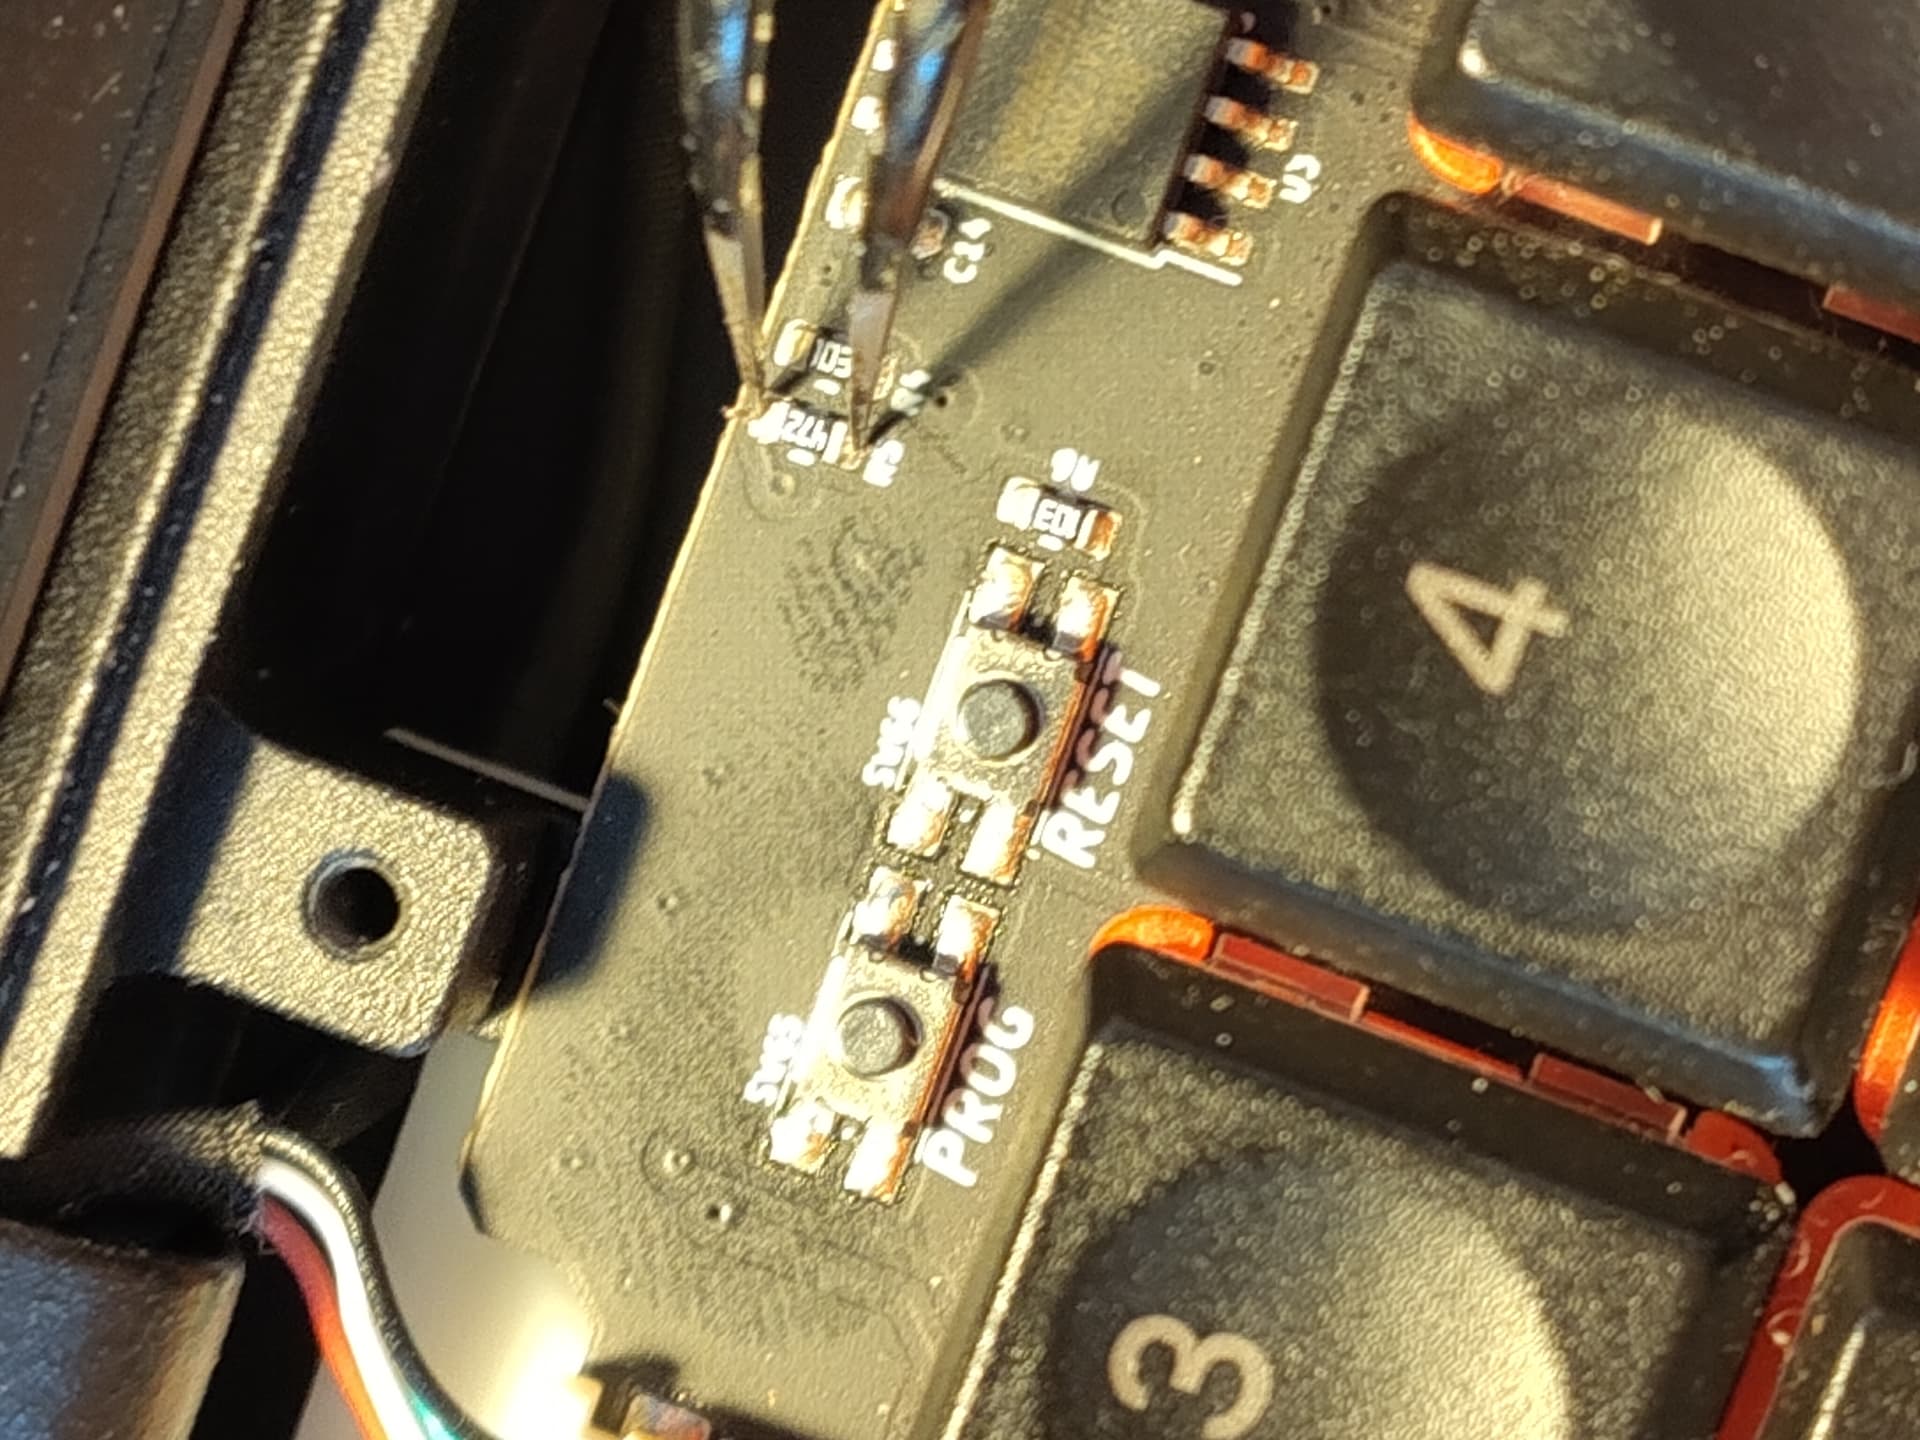
Switch DIP switch “PROG” on the motherboard to ON (not “1”). It’s near the 6 pronged dupont pins sticking out.
Press the button next to the PROG switch (it’s the LPC reset switch)
Now connect the internal USB-C connector (SYSUSB) of the motherboard to another computer
The RP2040 will show up as a virtual drive (like a USB stick) (this works also on Windows, Mac)
Drag/copy the sysctl.uf2 into this drive, then eject the drive
Alternatively, you can use picotool load sysctl.uf2 in a terminal console
Switch the PROG switch off
Press the reset button once more
Screw the motherboard back in
Move the 2 jumpers near the internal USB-C connector (SYSUSB) back to their original position, close to the USB-C connector
Now, once you connect a USB-C PD power supply for the first time after a sysctl reset (with the button or toggling the standby switch), the machine will turn on and boot automatically
If your disk is corrupted you might need to power cycle twice so it repairs automatically
Once booted, connect an external keyboard and run the keyboard flashing script again until it succeeds
Sorry, I forgot one step in the instructions. You have to set the 2 jumpers behind the internal USB-C port to the other position (facing away from the USB-C port). And when you’re done with everything, put them back. Does it work then?
At what point of the procedure do I have to set those two jumpers?
I’m just very cautious at this point because it’s already a very stressful experience and I really don’t want anything to get even worse. So, precise instructions would help.
I’ve added the steps to the list above now. You can do it at any point before connecting the computer to the motherboard with the USB-C cable. These jumpers just directly connect the 2 USB data lines (D+ and D-) to the port. Usually they connect the RP2040 to the main SoC, so you can flash internally. In this case, we want to flash externally, thus we change this connection.
Yes, but I also put back copies of the scripts in the original place now and those include the hardcoded new FW build number. So the original one-liner should work again now.
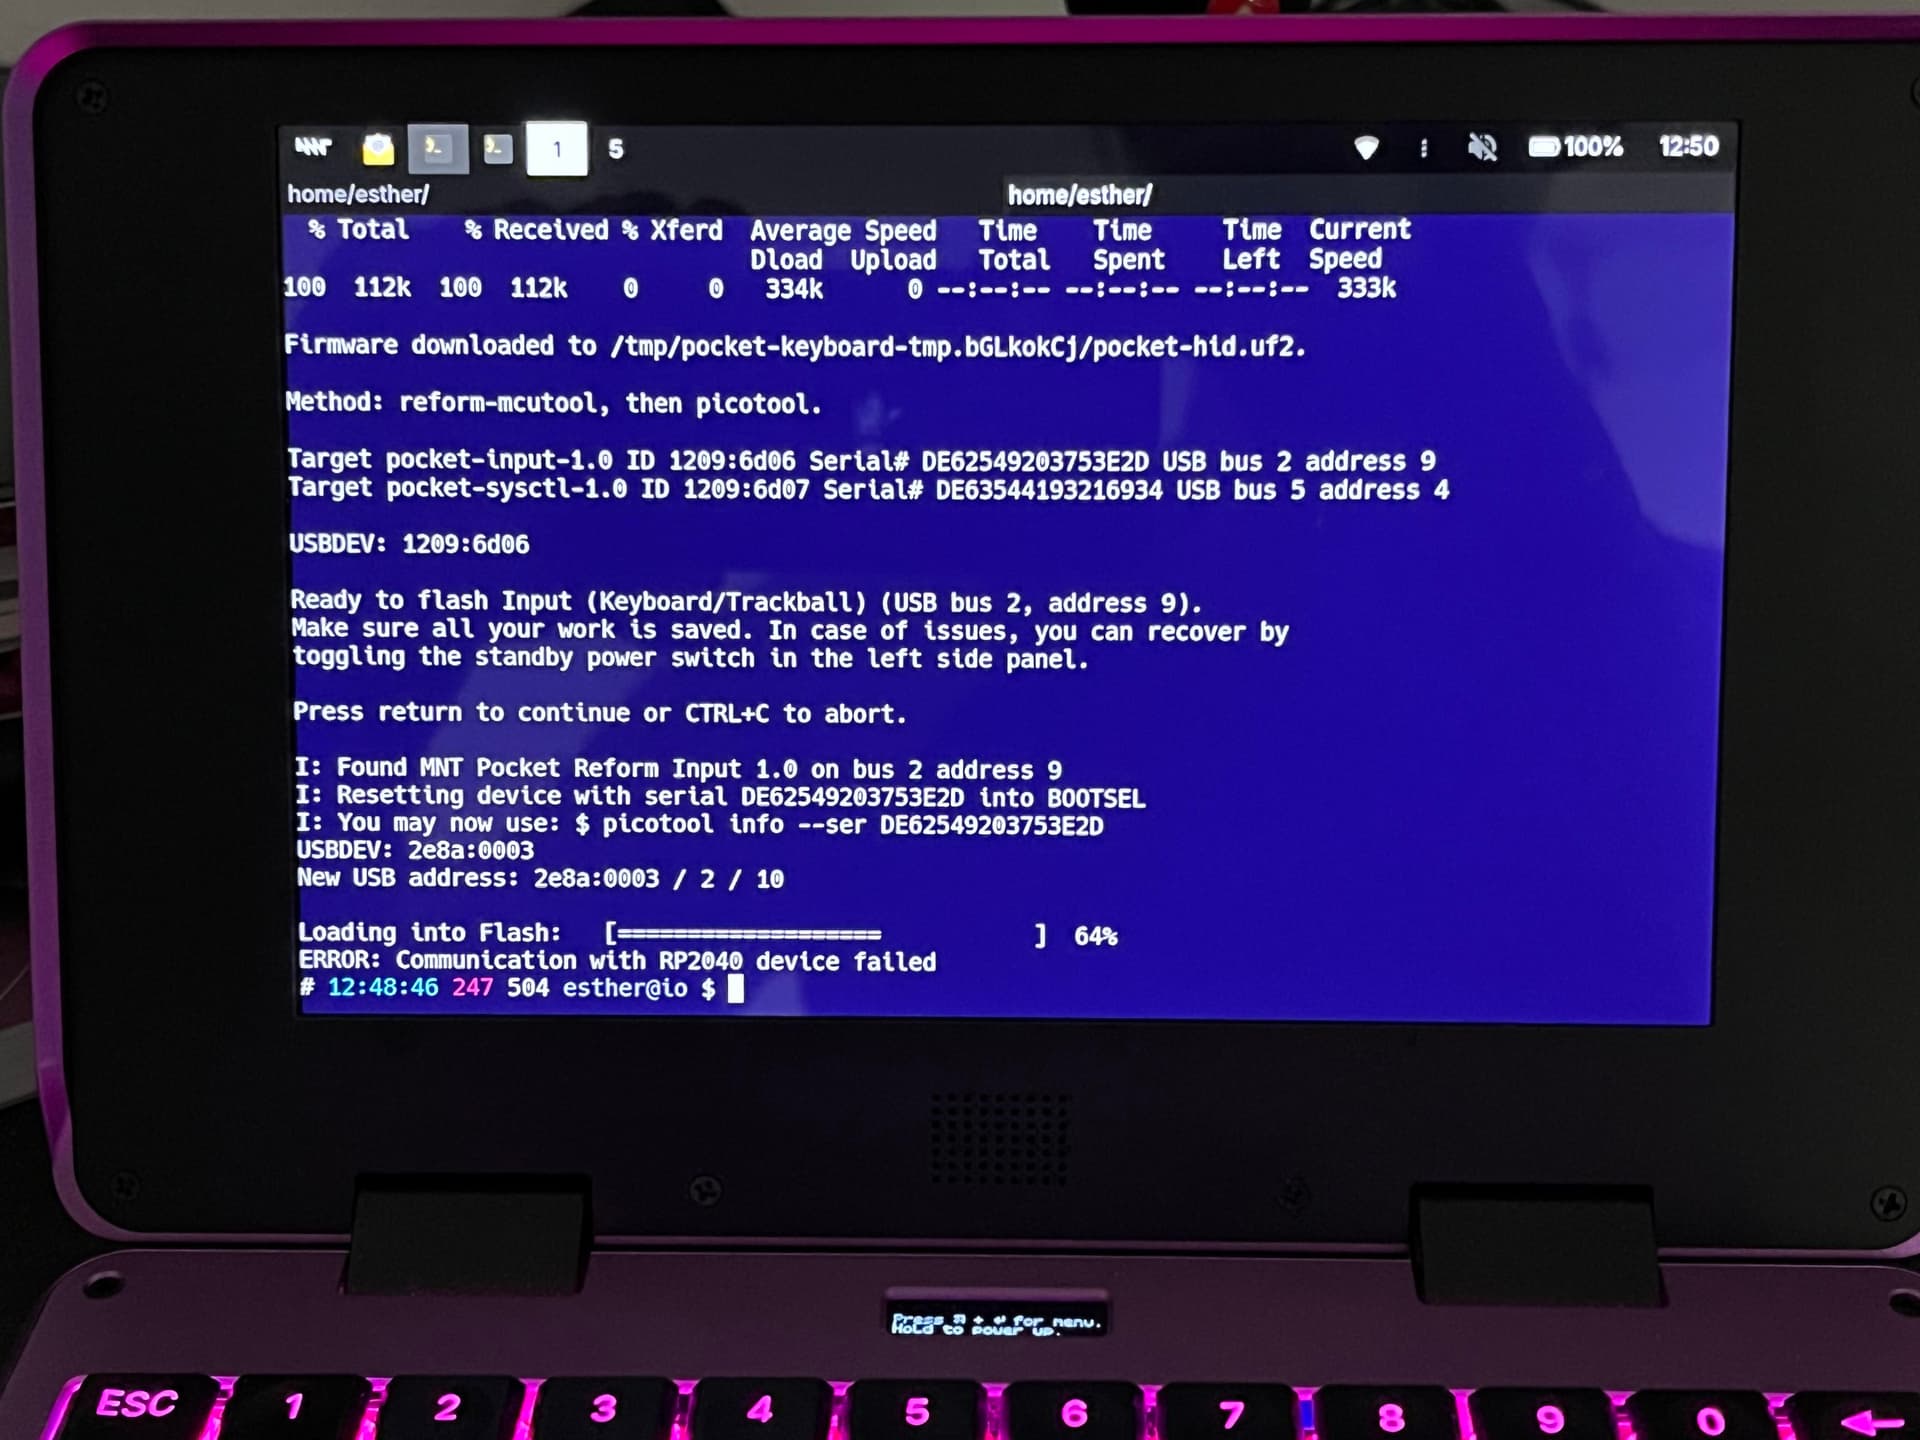
$ curl -sfL mnt.re/update-pocket-keyboard | sudo bash -
[sudo] password for esther:
Model: MNT Pocket Reform with RCORE RK3588 Module

MNT Pocket Reform host detected, assuming you want to flash the system that
is running this tool.

Downloading firmware to /tmp/pocket-keyboard-tmp.YvUmF1I6/pocket-hid.uf2...

  % Total    % Received % Xferd  Average Speed   Time    Time     Time  Current
                                 Dload  Upload   Total   Spent    Left  Speed
100  112k  100  112k    0     0  51070      0  0:00:02  0:00:02 --:--:-- 51085

Firmware downloaded to /tmp/pocket-keyboard-tmp.YvUmF1I6/pocket-hid.uf2.

Error: MNT Pocket Reform Input device not found or more than one found.
$ lsusb
Bus 001 Device 001: ID 1d6b:0001 Linux Foundation 1.1 root hub
Bus 002 Device 001: ID 1d6b:0001 Linux Foundation 1.1 root hub
Bus 003 Device 001: ID 1d6b:0002 Linux Foundation 2.0 root hub
Bus 003 Device 002: ID 0451:8142 Texas Instruments, Inc. TUSB8041 4-Port Hub
Bus 003 Device 003: ID 0e8d:7612 MediaTek Inc. MT7612U 802.11a/b/g/n/ac Wireless Adapter
Bus 004 Device 001: ID 1d6b:0002 Linux Foundation 2.0 root hub
Bus 005 Device 001: ID 1d6b:0002 Linux Foundation 2.0 root hub
Bus 005 Device 002: ID 1209:6d07 Generic Pocket Reform System Controller 1.0
Bus 006 Device 001: ID 1d6b:0003 Linux Foundation 3.0 root hub
Bus 007 Device 001: ID 1d6b:0002 Linux Foundation 2.0 root hub
Bus 008 Device 001: ID 1d6b:0003 Linux Foundation 3.0 root hub
Bus 008 Device 002: ID 0451:8140 Texas Instruments, Inc. TUSB8041 4-Port Hub
Thanks! The internal keyboard doesn’t show up here. This is probably because the firmware was half-flashed and doesn’t work/run now. To force it to bootloader ROM mode, you can (I just tried this with my device):
Open sudo dmesg -w in a terminal to live watch for kernel messages/USB dis/connects.
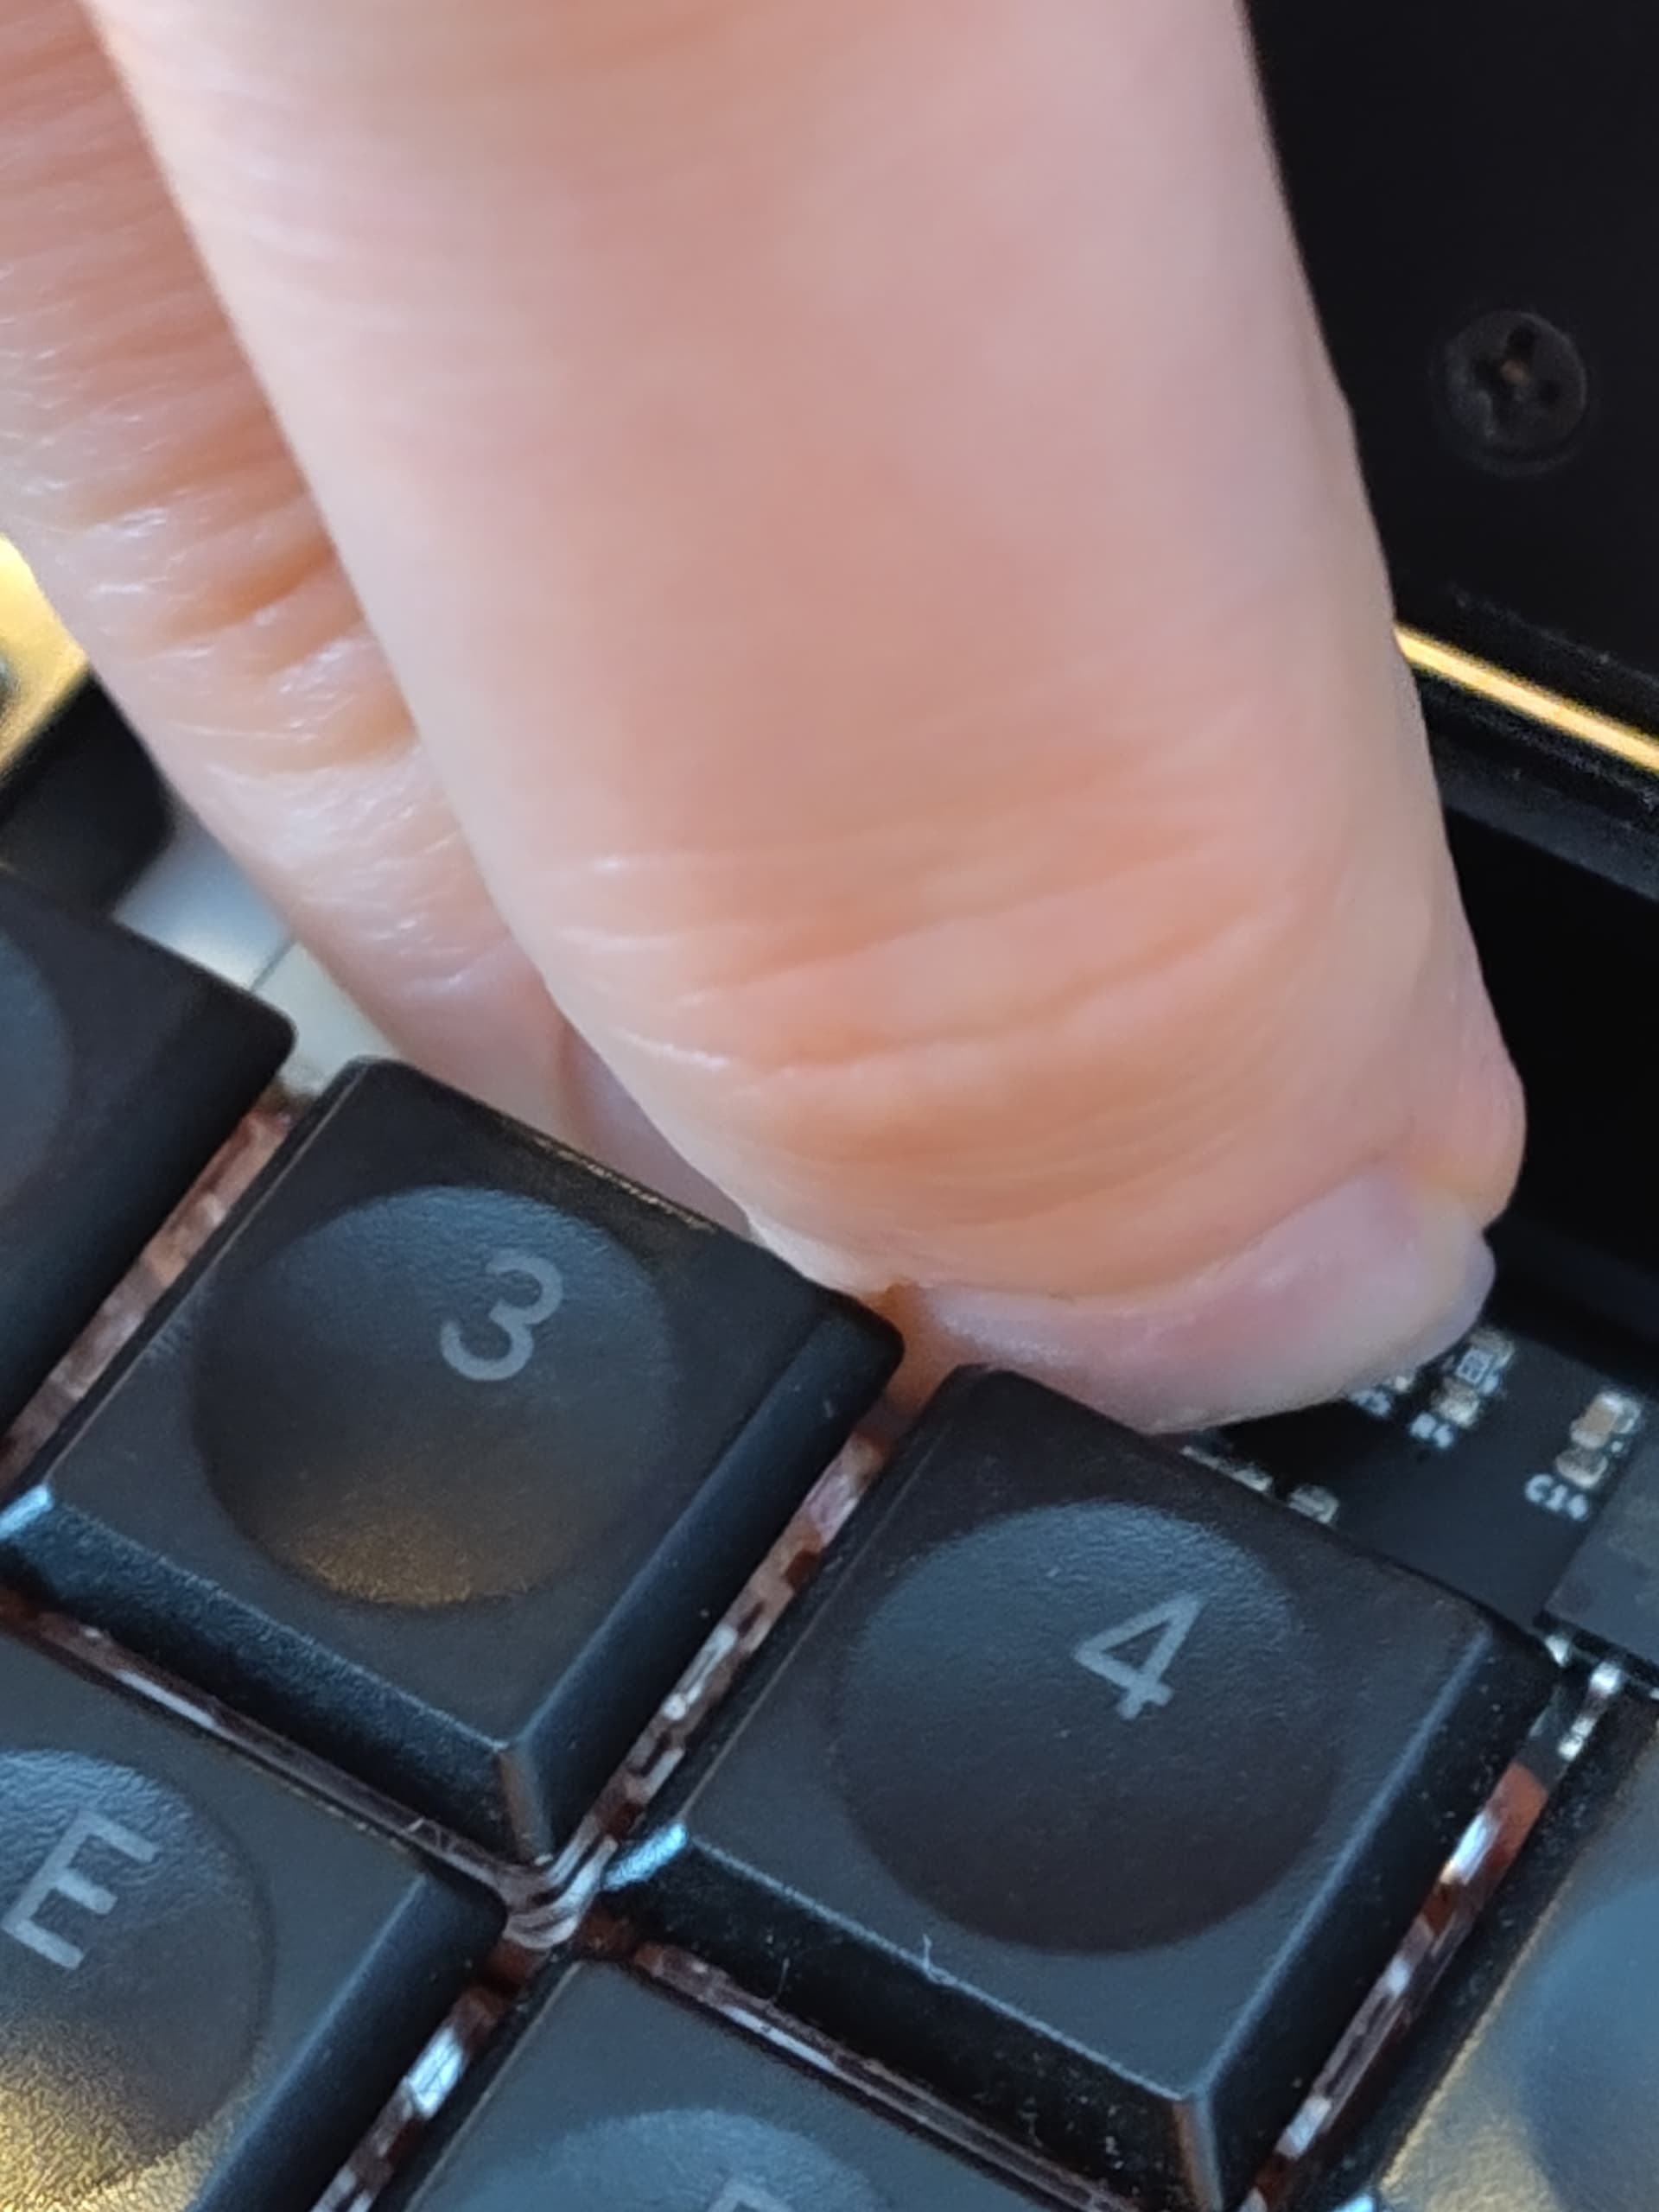
Unscrew and remove the keyboard frame
Be careful about the neodymium magnets that are now exposed along the bottom edge (2 left, 2 right). Don’t close the device with the keyboard frame removed, or the magnets can attach to the top half (inconvenient).
Bridge resistor R5 with needle nose pliers (or similar). I’ll attach some phone pictures here in a moment.
While it’s bridged, press and hold the PROG button with a finger of the other hand (~3 seconds).
If that doesn’t react, press the RESET button together with the PROG button (whilst still keeping R5 bridged, otherwise it won’t work!).
This should make output about a USB mass storage device appear in dmesg.
Ah, I’m very glad and relieved that you got it working again. Sorry that this can get so complicated. These learnings can help inform some design improvements for second revision keyboards and motherboards.